Showing posts with label Cooking School. Show all posts

October 30, 2012

Spooky Spider Cake, Nutella Edition!

All hallows eve... A time for pumpkin carving, costume making, and as usual around here, cake making. I've got a thing for spiders this year, having so far made them using chocolate M&Ms (using sprinkles for tiny spider feet on M&Ms as cupcake toppers or on cookies with royal icing feet) and with buttercream, randomly planted all over this tasty Nutella-inspired cake.

I found the original recipe for an awesome marble cake complete with chocolate ganache spiders on the Cooking Channel's site. However, the original seems to be rather complicated and requires three pages of directions to execute. I simplified it pretty dramatically below, and I even introduced more Nutella into the cake portion of the recipe (the original only calls for it in the frosting). Let me just say, this Nutella fudge frosting may perhaps be my new favorite cake topping. Let's just admit it: Nutella in anything improves things tenfold! Put it in cake and frosting, and well, you'll be in cake coma in no time!

So what is the deal with Nutella? This site provides the complete lowdown on Nutella. Created by Italian pastry maker Pietro Ferraro using hazelnuts to compensate for a cocoa shortage due to World War II food rationing in Italy, it didn't actually make it onto the food scene in the United States until the early 1980s. And as many things go in the world of food, it has since garnered its own day of celebration, World Nutella Day, February 5. I'll put a reminder into my calendar now to give you all another recipe for celebrating this February!

In the meantime, enjoy making this Nutella marble cake this Halloween and share it with the spooky spiders in your life!

Nutella Marble Cake

2 1/4 cups (7.25 ounces) cake flour, sifted
2 teaspoons baking powder
1 teaspoon baking soda
1/4 teaspoon salt
1/2 cup (1 stick or 4 ounces) unsalted butter, room temperature
1 1/4 cups granulated cane sugar
2 large eggs, room temperature
3/4 cup light sour cream, room temperature
1 1/2 teaspoons vanilla extract
1/2 cup milk, room temperature
3 tablespoons Nutella
3 tablespoons unsweetened cocoa (baking cocoa, not hot cocoa mix)

Nutella Fudge Frosting

1 cup (8 ounces) egg whites (from about 8 large eggs)
2 cups granulated white sugar
1 1/2 lbs (6 sticks) unsalted butter, room temperature, cut into tablespoon-size chunks
pinch of salt
1/2 cup Nutella
4 ounces bittersweet chocolate (65% cacao), melted and cooled
1 teaspoon vanilla extract
Black gel food coloring

For the cake: Preheat oven to 350°F. Spray three 8-inch round cake pans with baking spray (preferably with flour). Line with parchment and spray again. Set aside.

Sift together flour, baking powder, baking soda, and salt in a medium bowl. In the bowl of a stand mixer fitted with a paddle attachment or a large mixing bowl, place butter and sugar. Beat until fluffy, about 5 minutes. Add eggs one at a time and mix well after each addition. Add sour cream and vanilla and mix until combined.

Add flour mixture alternately with milk in three batches. Split the batter in half and sift cocoa powder over half. Add Nutella to cocoa powder half and mix well. Alternate scoops of vanilla batter and Nutella batter to cake rounds until completely divided evenly among the pans. Drag a butter knife or small rubber spatula thru batters until marblelized. Bake 25-30 minutes or until toothpick or skewer inserted comes clean. Allow to cool on racks for 10 minutes, then remove from pans and cool on racks completely.

For the frosting: In the top portion of a double boiler or the bowl of a stand mixer, combine egg whites and sugar. Mixture will be grainy. Turn up heat on pan with water to medium-high and place bowl with egg white mixture on top. Whisk constantly until mixture reaches 160°F on a candy or probe thermometer. (Do not leave unattended or egg whites will cook!) Remove bowl from heat and beat on high until stiff shiny peaks, about 7 minutes. Make sure the bowl has cooled off significantly before adding the butter. Lower speed and add butter in tablespoon-size chunks, mixing well after every 2-3 tablespoons. Add salt and vanilla and mix well. Remove from mixer and fold in Nutella and cooled melted chocolate.

Assembly: Place cooled cake round on 10" coated cardboard cake circle. Frost top of round with Nutella Fudge Frosting. Repeat with remaining layers and frost top and sides with one crumb coat. Refrigerate 15 minutes and apply final outer layer of frosting. Pipe border with Nutella Fudge Frusting. Tint a half cup of frosting black using gel food color. Pipe spiderweb and spiders as shown. Serves 12-14. Store in an airtight container in refrigerator for up to 3 days.

Note: The above frosting recipe begins with a standard Swiss meringue buttercream. If you stop before adding the Nutella and melted chocolate, you have a basic vanilla buttercream. For a white chocolate buttercream, add 4 ounces cooled melted white chocolate. For a chocolate buttercream, add 4 ounces cooled melted dark chocolate and 3 tablespoons cocoa (sift over buttercream before mixing in).


May 27, 2012

Whoopsie Daisy! Mistake with Marshmallows Makes for Mighty Tasty Treat

I've been making marshmallows since pastry school, and I'm quite proud to say they've always turned out... until last week. When embarking on a new recipe, I used to need to make it as-is the first time through. But I've learned enough about method and ingredients after all this time to futz around with an original recipe and still have it turn out right. Alas, this particular attempt got the better of me when I decided to substitute water for whiskey in making a spiked version of candied bacon marshmallows. I didn't really think alcohol would affect structure and figured it could be substituted wherever water was needed in the process. Unfortunately, I was wrong!

Making marshmallows requires blooming unflavored gelatin in water. Most recipes require water divided, with portion used to bloom the gelatin and another smaller amount later with the simple syrup you make on the stove. I tried it with whiskey in the bloom and water in the simple syrup, and I ended up with a runny, sticky mess I pitched down the garbage disposal. I tried the reverse the second time (saves a bit on whiskey too), and I ended up with more of a marshmallow fluff--usable but not really firm enough to be marshmallows.

Some research on the subject brought me to this site, Gelatin Food Science, which is the ultimate food nerd's answer to all things gelatin. The following statement described my problem to a T: "Competition between gelatin and glucose polymers for water in low water content products can result in, at worst, precipitation of the gelatin and at best a marked loss in gelling properties or hardness of the product."

So I'd robbed my marshmallows of vital water by subbing water for alcohol, which limited the gelling capabilities overall. Bummer! A quick Google search on "marshmallows with alcohol" renders a lot of recipes where the alcohol is just added as a flavor with the vanilla in the end. Point to remember!

Nonetheless, I ended up with a fine batch of marshmallow fluff for making frosting, and the following recipe was born: French Toast Whoopie Pies with Candied Bacon Whiskey Marshmallow Filling. Go ahead... Eat them for breakfast. They were already born from a mistake, so eating dessert first shouldn't really matter!

French Toast Whoopie Pies

2 1/4 cups all-purpose flour
1 1/2 teaspoons baking powder
1 teaspoon baking soda
1/2 teaspoon salt
1 teaspoon cinnamon
1/4 teaspoon nutmeg
1 stick unsalted butter, room temperature
½ cup granulated sugar
½ cup packed light brown sugar
2 large eggs, room temperature
1 teaspoon vanilla extract
½ cup buttermilk

Preheat oven to 375 F. Line two baking sheets with parchment paper.

In a medium bowl, whisk together the flour, baking powder, baking soda, salt, cinnamon, and nutmeg. Set aside.

In the bowl of a stand mixer fitted with the paddle attachment, beat the butter and both sugars on medium speed until light and fluffy, about 3 minutes. Add the eggs, one at a time, and beat until combined. Add the flour mixture in three intervals, alternating with the buttermilk and mix just until combine. Add the vanilla and beat on medium for 2 minutes, until completely combined. Using a small 1-inch cookie scoop, drop the dough onto the prepared baking sheets, leaving about 2 inches of space between cookies. Bake the cookies, one sheet at a time, for 8-10 minutes, or until they are set and just beginning to brown. Let the cookies cool on the baking sheets for 5 minutes before transferring to a wire rack to cool completely. Sandwich together with Candied Bacon Whiskey Marshmallow Filling. Makes 12-15 whoopie pies.

Candied Bacon Whiskey Marshmallow Filling for Whoopie Pies (adapted from Kitchen Konfidence)

Cooking spray
1/2 cup packed light brown sugar
1/2 teaspoon cinnamon, divided (1/4 for bacon, 1/4 for marshmallows)
6 strips all-natural thick-cut bacon
4 1/2 teaspoons unflavored powdered gelatin
1/2 cup cold water
2/3 cup granulated sugar
1/2 cup real maple syrup (not Log Cabin!)
1/4 cup light corn syrup
1/4 cup bourbon or rye whiskey
1/2 teaspoon fine sea salt
1/2 stick (1/4 cup) unsalted butter, room temperature
1 1/2 cups powdered sugar, sifted

Preheat your oven to 350°F and place a rack in the center of the oven. Line a baking sheet with parchment and place an oven-proof baking rack inside it. Coat the rack with cooking spray and set aside.

Stir together light brown sugar and 1/4 teaspoon cinnamon on a plate. Rub each slice of bacon on both sides with cinnamon sugar until evenly coated. Lay strips of bacon on rack on baking sheet. Bake for 30 to 35 minutes until deeply caramelized. Let cool then finely chop.

Combine gelatin and cold water in a small bowl, whisking to combine. Let stand for at least 5 minutes.

In a medium saucepan, combine granulated sugar, maple syrup, corn syrup, whiskey, and sea salt, stirring to combine. Bring to a boil over high heat, stirring occasionally. Clip a candy thermometer or insert a metal probe thermometer into the mixture and continue to boil until it reaches 240°F. (If the mixture starts to bubble up too much, lower the heat.) Remove from heat once the mixture reaches 240°F.

Microwave the gelatin on high for 30 seconds. Pour into the bowl of a stand mixer fitted with the whisk attachment. Whisk on low for a moment then slowly pour in the hot syrup mixture. Beat on high for 10 minutes. Fold in 1/4 teaspoon cinnamon and scoop mixture into plastic container. Seal tightly and refrigerate for up to 1 month.

To make filling for whoopie pies, cream together 1 cup candied bacon whiskey marshmallow fluff and 1/2 stick unsalted butter. Add 1 1/2 cups powdered sugar and mix until stiff and spreadable. Pipe onto whoopie cookies or scoop using 1-inch cookie scoop.


April 9, 2012

Want Not, Waste Not: Using Up Leftover Ingredients

Don't you just love it when a recipe calls for 1 cup of buttermilk or a 1/2 cup of heavy cream, and you're left with a quite usable portion of an expensive, valuable ingredient and nowhere for it to go?

In a caterer's kitchen, this is a regular state of wonder, especially during what we consider our "slow" season. This is that time between the winter holidays and Easter, when people aren't quite ready to get back on the treat wagon and start chowing down on decadent desserts. Everyone's still into their New Year's workout regimens, and heavy cream isn't even in the average vocabulary at this time of year. I may get an order here, a small delivery there, and in between, I'm left with odd amounts of rich ingredients I just can't bring myself to throw out. And admittedly, I am hard-pressed to throw out any type of ingredient in this economy!

If you're ever in a similar situation, here are some ideas to help make the best use of random leftover ingredients in your kitchen. I've included ideas for the ingredient's main use, followed by something you can make with the leftover amounts.

Heavy Whipping Cream

Main Recipe Uses: Ice cream, custards or whipped topping for pies, chocolate ganache for truffles, thickener for heartier soups or bisques, caramel candy or caramel sauce
Leftover Uses: Homemade mascarpone, butter

No kidding! You can make mascarpone from scratch, which can serve as an indulgent bagel spread, lasagna filling, or cinnamon roll frosting--basically anywhere you'd normally use cream cheese or even ricotta cheese. Follow this tutorial on making your own mascarpone. It requires some time overnight in your fridge before use, so it's not faster than going to the grocery store and purchasing some if you need it, but it is cheaper. Mascarpone can cost upwards of $5 for 8 ounces, so if you have heavy cream on hand from a previous recipe, make it yourself, and you'll taste the difference in your tiramisu. As for butter, Joy the Baker provides a great tutorial with images here. You can even flavor your homemade butter right in your stand mixer or mixing bowl using herbs, honey, jam--you name it!

Buttermilk

Main Recipe Uses: Acidic liquid for cakes, ice cream or sorbet, biscuits or bread
Leftover Uses: Mashed potatoes, waffles or pancake batter, homemade ranch salad dressing

Use leftover buttermilk in place of any liquid (milk, chicken broth) you would normally add when whipping or ricing your mashed potatoes. To use in waffle or pancake batter, you'll want to reduce the baking soda in the recipe by at least a half teaspoon, since buttermilk is acidic as it is. As for homemade ranch salad dressing, which will fast become better tasting to you than store-bought, Eating Well has a tasty recipe I've made with leftover buttermilk for years. It's also a great way to use leftover herbs of which another recipe might have only requested a twig or two.


Tomato Paste

Main Recipe Uses: Pasta and pizza sauce, flavor and color to soups and bisques
Leftover Uses: Homemade ketchup!

How many times have you opened a 6-oz can of tomato paste and used 1 mere tablespoon? Drives you crazy to watch that can grow a fuzz of mold, despite tightly wrapping it, over the next week or so. Try this homemade ketchup recipe, containing vinegar and sugar, which serve as preservatives that can keep mold at bay and more natural flavors in play. Most commercial-grade ketchups contain high-fructose corn syrup or other unnatural sweeteners. Once you start making your own ketchup, it'll be hard to go back to Heinz. This recipe calls for the whole 6-oz can, so if you're using a partially used can of paste, just reduce the additional ingredients accordingly. For example, there are about 5 tablespoons of tomato paste in one 6-oz can, so if you're down a tablespoon. just reduce all the other ingredients in this ketchup recipe by 20%.

Cream Cheese

Main Recipe Uses: Too many to count!
Leftover Uses: Cream cheese frosting, "cooking cream"

I've done my fair share of recipes that call for either only 3 ounces of cream cheese (the tiny, higher-priced package in the dairy case) or half a regular 8-oz brick of cream cheese. Buying the 3-oz package at a higher price-per-ounce doesn't make sense when there are so many additional uses for the leftover 4 or 5 ounces from a regular-size brick. Philadelphia Cream Cheese has gone so far as to create a new product line called Cooking Creme in sweet and savory options. Granted, the recipes on Kraft Foods' site call for a 10-oz tub of their famous Cooking Creme, but in general, if you just want to bring a creamy consistency to an average pasta dish, a few tablespoons of cream cheese makes it happen. Season according to taste; you don't necessarily need Philadelphia's Cooking Creme flavor profiles, especially if that standard pasta dish already has seasonings you've always enjoyed. I like to debunk the food industry's method of making you believe you need to start buying something you've always had around your house in a simpler form. And when all else fails, just throw that half brick into a bowl with a stick of softened butter, a pound of 10x confectioner's sugar, and a teaspoon of vanilla and beat on high until smooth. Voila! You've got cream cheese frosting, which by the spoon, between a couple layers of cake, or atop a cupcake is always a delectable treat!


January 22, 2012

'Tis the Year of the Dragon


January 23 is Chinese New Year. Time to celebrate the Year of the Dragon, a sign of good fortune and great power. Anyone born this year should be honored and respected. So how about doing that with a nice dim-sum-oriented spread?
 
To me, potstickers are a Far East comfort food. There's something about a pair of chopsticks, a chubby dumpling, and some sweet and salty dipping sauce. I really enjoy some crunchy crab rangoon for starters when getting Chinese take-out, but I know everyone can go without the fried-food calories this time of year. I've revamped a longtime recipe in my arsenal to be baked in phyllo dough instead of using wonton wrappers and frying them. And who doesn't love a little oriental-inspired dessert? Matcha (green tea) latte chocolate chip cupcakes with Chinese five-spice fudge frosting wrap up your trip on the Oriental Express nicely. So go on, celebrate the Year of the Dragon with a little honor and respect to the ultimate of Chinese comfort food gods!

Chinese Potstickers (adapted from Cooking Light)

For the dumplings:
3 cups chopped napa (Chinese) or savoy cabbage (about 4 ounces)
4 dried shiitake mushrooms (about 1 1/2 ounces
1/4 cup finely chopped green onions
2 tablespoons plus 1 teaspoon cornstarch, divided
1 1/2 teaspoons minced peeled fresh ginger
1 teaspoon sugar
1 1/2 teaspoons oyster sauce
1/8 teaspoon white pepper
5 ounces lean ground pork
5 ounces ground chicken breast
1 large egg white
48 gyoza skins
1/4 cup canola oil, divided
1 1/3 cups water, divided
 
For the sauce:
1 teaspoon ground ginger
2 tablespoons minced green onions
1/3 low-sodium soy sauce
3 tablespoons balsamic vinegar
2 tablespoons dry sherry
2 teaspoons oyster sauce
2 teaspoons chile puree with garlic sauce, such as Sambal Olek
2 teaspoons dark sesame oil
 
To prepare dumplings, cook cabbage in boiling water 1 minute or until tender. Drain and rinse with cold water; drain. Cool; chop.

Place mushrooms in a small bowl; cover with boiling water. Cover and let stand 30 minutes or until tender. Drain mushrooms; chop.
 
Combine cabbage, mushrooms, 1/4 cup green onions, 2 tablespoons cornstarch, and next 7 ingredients (through egg white) in a large bowl. Cover and refrigerate 4 hours.

Working with 1 gyoza skin at a time (cover remaining gyoza skins to prevent drying), spoon 2 teaspoons pork mixture into center of each skin. Moisten edges of gyoza skin with water. Fold in half, pinching edges together to seal. Place dumpling, seam side up, on a baking sheet sprinkled with remaining 1 teaspoon cornstarch (cover loosely with a towel to prevent drying). Repeat procedure with remaining gyoza skins and filling.

Heat 1 tablespoon canola oil in a large nonstick skillet over medium-high heat. Add 12 dumplings to pan; cook 3 minutes. Add 1/3 cup water. Reduce heat, and simmer 3 minutes or until water evaporates. Repeat procedure with remaining canola oil, dumplings, and water.

To prepare the sauce, combine all ingredients in a small bowl. Serve sauce with dumplings. You can also use prepared Gyoza Sauce or Ponzu Dipping Sauce found in your grocer's international foods aisle. Yields 16 servings (serving size: 3 dumplings and about 1 tablespoon sauce)

Phyllo Crab Rangoon (adapted from the kitchen of L. Peters)

1 8-oz packages) light cream cheese, room temperature
1 can (6 oz) lump crabmeat, drained
1/4 teaspoon salt
1 teaspoon garlic powder
1 teaspoon onion powder
cooking spray or melted butter (depending on how many calories you want to save!)
1 roll phyllo dough (from a 2-roll package), thawed

Combine the cream cheese and crabmeat and mix until smooth. Add salt, garlic, and onion powder. Unroll phyllo dough and follow this tutorial if you've never made phyllo triangles before. Place triangles on parchment-lined cookie sheet and bake at 350 for 15 minutes or until golden brown. Allow to cool 5 minutes before serving. Serve with sweet and sour sauce or soy sauce. Makes 24 appetizers.

Green Tea Latte Chocolate Chip Cupcakes

1 1/3 cups all-purpose flour
1 teaspoon baking powder
1/4 teaspoon salt
8 tablespoons (1 stick) butter, room temperature
1 cup sugar

1/4 cup Trader Joe's Matcha Latte Mix 
2 eggs, room temperature
1/2 cup milk, room temperature
1/2 teaspoon almond extract 

2-3 drops green food color
3/4 cup mini chocolate chips

Preheat oven to 350°F. Line two 12-cup muffin tins with about 15 cupcake liners and set aside.

In a medium bowl, sift first four ingredients together and set aside. In a large bowl, cream butter, sugar, and latte mix together with an electric mixer until light and fluffy, about 3 minutes. Add eggs, one at a time, and mix well each time. Add dry ingredients alternately with milk in four additions (flour, milk, flour, milk) and mix until virtually no lumps (about 3-5 minutes). Add almond extract and 2-3 drops of food color. Stir to combine. Divide evenly in lined cupcake pan (no more than 2/3 full) and bake 16-18 minutes until golden or toothpick comes clean. Cool completely before frosting. Makes 12-15 cupcakes.

Chinese Five-Spice Chocolate Buttercream

3 3/4 cups (1 lb) powdered sugar, sifted
1/2 cup unsweetened cocoa
1 teaspoon Chinese Five-Spice Powder (pre-ground McCormick and Penzey's brands also available)
1/2 cup (1 stick) butter, room temperature
4 tablespoons milk
1 teaspoon vanilla

In a medium bowl, sift together sugar and cocoa; set aside. In a large bowl, beat butter with electric mixer until light and fluffy. Add powdered sugar, cocoa, and five-spice powder and mix to combine. Add milk and vanilla and continue beating until creamy. If desired, add more milk until frosting is spreading consistency. Fill a pastry bag with a large star tip and pipe on top of cupcakes or use small spatula and spread on desired amount. For a cute fortune cookie cupcake topper, follow this link.

February 1, 2011

For Perfect Roast Chicken, Get Yourself a Brick

The next must-have kitchen gadget isn't at Sur La Table or Williams-Sonoma. It's at Home Depot.

This isn't to deny my affection for fancy kitchen implements. The only way you'd take away my Le Creuset Dutch oven is from my cold, dead hands! But I must confess my adoration of the humble brick. I owe it my gratitude for its role in helping make the most flavorful and moist roast chicken I have ever made.

I take roast chicken seriously. There's perhaps no better test of a cook to get it right. It's simple, but not easy. Two things usually foul (fowl?) up roast chicken. The first is insufficiently brown, or worse, rubbery skin. A more glaring fault is dry, stringy breast meat. That's because chicken breasts, like those of other birds, cook more quickly than the legs and thighs. By the time the latter cook completely, the former too often have entered shoe leather territory.

A brick (and pair of sturdy scissors) address these shortcomings. You'll need the scissors, or a sharp knife, to remove the chicken's backbone—an easy feat that will take no more than 1 minute—so that it lays open like a book. The brick forces the chicken flat, ensuring even cooking. In 45-50 minutes—much less time than conventional roasting techniques—you'll pull a perfectly cooked bird from the oven, with the requisite crisp, golden skin to match.

A note about the chicken itself: I highly recommend the Empire kosher brand, which I find at Trader Joe's. I won't pretend to be an expert on kosher slaughter techniques, but I know the process involves salting the meat, a practice that boosts flavor and helps the chicken retain moisture. (You can achieve the same effect by soaking your chicken in cold salted water, a procedure known as brining. Click here for a primer.) I give the chicken an added boost with a marinade of equal parts lemon and olive oil and fresh herbs. Rosemary and thyme are classic chicken-friendly herbs, but tarragon would pair nicely too.

Below you'll find a step-by-step guide to chicken under a brick, or as the Italians call it, chicken al mattone. (It always sounds better in Italian, doesn’t it?)

First, turn the chicken breast down, and with a sturdy pair of scissors, cut along one side of the back bone. Cut from one side to the other. Repeat on the other side of the backbone. The bone will be your guide. (When you attempt this maneuver, you'll see what I mean.)


Next, flatten the chicken with the palm of your hand as if you were mistreating a book. Rub the marinade on the front and back of the chicken. I prefer an all-day marinade, but an hour or two will do in a pinch. Any longer, though, would be a bad idea. The lemon juice may start "cooking" the chicken.


Preheat the oven to 425 degrees F. In an oven-proof frying pan, saute the chicken, breast side down, in a couple tablespoons hot olive oil for approximately 7 minutes. The chicken should be well-browned.


Wrap the brick in foil (see below) and set it atop the chicken, with the chicken remaining breast side down. This will ensure even cooking and perfectly browned skin. Insert pan in oven and roast for 30 minutes. (When my chicken is on the smaller side, around three pounds, I usually roast it for a little less, around 27 minutes.)


Remove the brick and carefully turn the chicken so that it's breast side up. Return to the oven for another 10-15 minutes. (After 10 minutes, I check to see if the chicken is done. Some fancy-pants cooks might advocate use of a thermometer. I prick the leg or thigh with a fork, and if the juices run clear, it's done.)


It's important to let the chicken rest for at least 10 minutes after roasting. As tempting as it looks, resist the temptation to carve into it. Its juices will end up on the cutting board rather than in your mouth. Loosely cover it with foil to keep it warm.


When you're ready to eat, you'll find it easy to cut into serving pieces. I love to serve roasted chicken with crusty bread and white beans, briefly sauteed in olive oil and rosemary. I'll also braise a hearty green, such as kale or Swiss chard, in olive oil and garlic. All complement the simplicity of the chicken so elegantly.


The last step is optional, though highly recommended: This dish, like any meal, is best enjoyed with special company. In this case, it was my equally zesty boyfriend, who just loves this dish.

November 24, 2010

The Blind Side of Baking

I realize this post is perhaps coming a bit late for your Thanksgiving baking, but in case you are planning for more pies this season, I wanted to comment on some recent experiences with blind baking, or what most people know as the prebaked pie shell.

Generally, the drama that ensues with prebaking a homemade crust is the slippage factor. It's very hard to keep a real all-butter or mostly butter pie crust from slipping into a big buttery pile at the bottom of your pie pan. For some reason, the machine-made, store-bought, full-of-palm-or-various-tropical-oils refrigerated or frozen pie crusts don't do that, and I'm not sure why. I'd imagine it has something to do with the amount of preservatives and other fake ingredients that hold it in place. Makes me wonder whether you really should be ingesting something that will most likely still be there in 2030.

Well, never fear; Flaky Pastry's here to help clear the path to homebaked pies. First, you need a trusty, all-purpose pie dough recipe. Dorie Greenspan's Good for Almost Everything Pie Crust recipe is a foolproof keeper around our house. I use it for everything, including chicken pot pie (and other savory pies), hand pies and turnovers, fruit pies, cream pies, nut pies, you name it. The sugar in it is negligible and mostly helps with the browning factor, so using it for savory baking is just fine. Some butter purists would balk at its use of shortening, but it actually aids in the flakiness factor. I highly recommend making her recipe as-is. Don't change a thing! You'll be thrilled with the finished product.

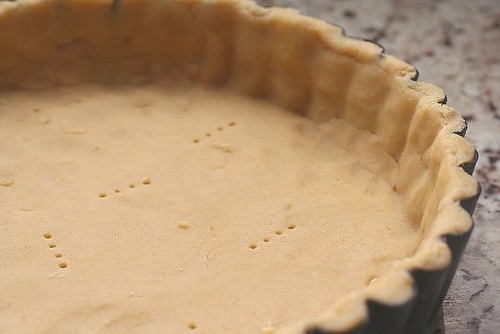
Once you've rolled out and placed your crust in your pie plate, and completed your decorative edge (whether it's the simple poke-and-pinch method I like to use or small cookie-cutter-cut shapes placed around the edges and egg-washed), you'll want to prick it with a fork all over the bottom and along the sides. Freeze your pie shell for 15-20 minutes. Next, place a sheet of parchment paper or foil in the center, pressing to make it flush against the crust. Fill the entire cavity with dried beans or ceramic pie weights. We're talking fill it to the brim, folks! I even try to tuck the parchment against the fluted edges and get beans into the corners so that my fluted edges are maintained. The key to prebaking a shell with no slippage is to weight it down properly and completely.

 Return your beans-and-shell to the freezer for 10 minutes while you preheat your oven to 425℉. Bake shell for 15 minutes and reduce the oven temperature to 375℉. Remove the pie weights/beans and parchment, brush the inside, sides, and edges with egg wash (1 egg yolk and 2 tablespoons milk, half-n-half, or cream), and return it to your 375℉ oven. Bake another 20 minutes and let cool on wire rack before filling.

You can dry out your beans on a sheet pan overnight for future use. I store mine in Ziploc bags in the pantry. Unfortunately, I have only recently switched to using beans, so I can't speak to how many times you can use them, but I suppose the beans will start opening and exposing themselves (!!!) after multiple uses, so definitely throw them out when they reach that point.

So hopefully, in the end, you'll get something that looks like this. This holiday weekend's orders included Chocolate Silk, Sweet Potato, and Banana Cream, all of which used this method for blind baking. So now, I'm going to shut my piehole and let you take it away! Happy Thanksgiving, everyone!

August 30, 2010

The Sugar Art of Learning

Many apologies for my lack of presence here. It's been one crazy summer (wedding season for a pastry chef always is), but I did manage to cram in a little continuing education for myself last week in Atlanta at the famed International Sugar Art Collection. I've taken classes with Chef Nicholas Lodge here in Chicago at my alma mater, The French Pastry School, and I have longed for an opportunity to go to his school down south and learn from the master of sugar artistry. You've probably seen him on Food Network, where he often serves as a judge for Wedding Cake Challenges and other cake-oriented insanity cable television is notorious for. But a day or two (or four, in my case!) in his classroom is like Cake Artistry 101, 201, 301, and 401 all at once! I learned more about recent fondant and gumpaste trends than I ever would struggling at home with books from Amazon. Well worth the trip and tuition!

Here are some of the all-stars from my four days there. See the captions in the Flickr roll for a description of the type of sugar artistry used in each example. I am excited about being able to offer these elements for cake orders going forward. Care to place an order??

July 31, 2010

Have a Ball!

Cake balls/pops/truffles/etc. seem to be all the rage these days. People have been asking me for some time what the next big thing after cupcakes will be, and I think this may be it. Bakeries all over the country have started offering them because they help make use of "cake droppings," as I like to call them. These are all the cake crumbs you're left with after a week of leveling cakes for stacking, filling, and frosting.

Basically, you take a 9" x 13" cake pan full of crumbs, add about 2 cups of frosting (perhaps less, depending on how moist your initial cake recipe is), squish it all together, and make balls about 1-2 inches in diameter. Freeze them individually on a sheet pan for 20-30 minutes and dip in tempered chocolate or chocolate coating. They're really cute on miniature cupcake liners, all boxed up and ready to go for party favors, hostess gifts--you name it!

Bakerella has made cake pops a worldwide phenomenon through her blog and now soon-to-be published book. These take a lot more effort but are probably worth it in the end. I can imagine the reaction you'd get from your crowd! Check out her site and view her amazing gallery of cake pop artistry. The first time I made them, it was more of a deliberate effort. The client wanted them to start with, so I had to bake a cake from scratch (because that's how I roll), crumble it up, make the frosting (because I just don't do canned frosting of course), and mix it all up for the ball "batter." It seemed like a lot of labor to basically have something mini-cupcake-sized anyway. I didn't quite get what the hubbub was about, but knowing its the best way to make use of "cake droppings" these days helps you feel more sustainable in today's waste-conscious society. You can even freeze your cake crumbs for up to 3 months and use them as needed.

I recently made a bunch of cake balls and debuted them at my book club. For years, these wonderful folks have been my test kitchen, and I have soooooo appreciated them for that. Everyone loved them and thought they were one of the best desserts I've brought to a meeting. One longtime clubber actually came up with the name I'll be using to add them to my menu: Bomb-bons! Very sassy and the perfect thing to call something that packs that much of a sugar punch!

So if you're interested in Bomb-bons a la Pomegranate Sweets & Savories, give me a call or visit my site to order some. I'll be posting the available flavors each week. This week, I'm featuring Grandma's Chocolate, Carrot, and Vanilla Buttermilk. And maybe, when Bakerella's book comes out, it might inspire me to work on a pomegranate-shaped one I can call my signature Bomb-bon!

May 9, 2010

Chocolate Chip Cookies Three Ways

I've been on a quest for the perfect chocolate chip cookie recipe. A few weeks ago, I had the middle schoolers I teach at a local youth center make the Nielsen-Massey chocolate cookie recipe I've been meaning to try for years. Recommended to me by a dear fellow baker friend of mine, I knew we could do no wrong with this one. They couldn't have come out more perfect, really. They were slightly crispy around the edges and evenly puffed from the middle out, so they were nice and chewy on the inside with some crunch to the edges. In fact, I think they looked quite like anything you'd buy in a box, but then tasted so much better. However, when I got home and tried the same recipe, they came out overly spread-out with hardly any heft to them at all. Like a bunch of flying saucers with chocolate chips in them! Disappointing in my pathetic Frigidaire convection oven (which is really just a mere bunch of gnomes huddled together and blowing from the back--convection my a$$!). In this case, I'd lend the perfection at school to the good ol' trusty Blodgett commercial convection oven. Oh, how I'd love to have one of those aerators in my home! I also think weak home ovens, like the Frigidaire brand in general (the stock developer's appliance from this housing bubble), don't really know what to do with all that butter, and so, well... spread happens.

Next up, I leaned back on my standard staple, Sherry Yard's Quintessential Chocolate Chip Cookies. I got her Desserts by the Yard cookbook about a year ago and switched over from the Tollhouse recipe to this then and have never really gone back. Her recipe requires a little less butter and quite a bit less sugar than the Nielsen-Massey one (you'd have to double Sherry's to come up with equal proportions to the Nielsen-Massey one). Again, a much more flat and crispy return than we got at school, but my husband and I actually liked the flavor of these better. I think we are fans of anything with less sugar, so I do believe this will still remain our staple chocolate chipper. One major difference with Sherry's recipe is that she asks you to give it some fridge-chillin' time--an hour or up to overnight. Interesting, since one doesn't really think of cookies as needing any kind of "glutenization" process. So I speculate she's just going for the chill-before-baking plan of action, which helps most cookies keep their shape. I often do this with my giant decorated cookies, chilling them cut and laid out in their pans for 10-15 minutes before baking. This helps keep them from spreading too much and maintains their sturdiness for handling during the decorating process and for packing and shipping. Next time, with Sherry's, I'm going to go for overnight and see if they hold their shape better.

Last but not least, a recipe on the back of the Gold Medal flour bag caught my eye, and I thought I'd try them tonight--Oatmeal-Chocolate Chip Cookies. I love oat-anything cookies because somehow, they make me feel less like I'm eating a cookie and more like I've got a granola bar in wolf's clothing! At the risk of sounding rather Goldilocks, these were just right! The gnomes in the back of the oven seemed to make them nice, puffy, and even like the ones at school, but then they were also chewy and crispy in all the right places. With the added heft of the oatmeal, they made the perfect ending to a weekend stuck inside working both days. Here's the recipe, with a special secret ingredient. If you like Indian fusion, you'll love this!

Chai Oatmeal-Chocolate Chip Cookies a la Gold Medal Flour

2 cups quick-cooking oats
1 1/2 cups unbleached all-purpose flour
1 teaspoon baking soda
1/4 teaspoon salt
1 teaspoon chai spice blend
1 1/2 cups packed light brown sugar
1 cup butter, room temperature
1 teaspoon vanilla
1 egg
1 cup semisweet chocolate chips
1 cup chopped nuts, optional

Preheat oven to 350 degrees F. In a medium bowl, sift together oats, flour, baking soda, salt, and chai spice. Set aside. In a large bowl, cream butter and brown sugar with an electric mixer until well-blended. Add vanilla and egg and mix well. Add dry ingredients and mix well. Stir in chocolate chips and nuts (I used a mix of butterscotch, white chocolate, semisweet, and M&Ms!).

Drop by rounded tablespoonfuls or with cookie scoop about 2 inches apart onto parchment-lined baking sheet. Bake 9-11 minutes or until golden brown. Cool slightly and remove from cookie sheets to cooling racks. Makes about 3 dozen.

April 27, 2010

What Exactly Is Monkey Bread?


Seriously. Who came up with it, why is it called that, and why is it just one of the best comfort foods around??? My middle-schoolers made it in our baking class yesterday afternoon, and that's the first thing they asked me. And I had no idea! So I promised them I'd research it and get back with them at tomorrow's class. (Also, Zesty Lemon is still working on his restaurant review, and I thought this post would entertain you in the interim.)

This account at The Food Timeline provides the most detail I've ever read on the subject. The recipe itself derives from typical sweet roll yeast breads of yesteryear, and monkey bread (a.k.a. bubble bread or pull-apart bread) can be traced back to pioneer days, when cowboys on the range preferred one-pot cooking for just about everything, including their daily bread. Early 20th-century cookbooks described all kinds of "balled rolls," including Parker House rolls and clover-leaf rolls, with its first official mention in the New York Times coming in 1976. Nancy Reagan even began serving it at the White House in the '80s.

However, one thing's for sure--no one really knows why it was ever called monkey bread to begin with. There are several possibilities, including how it resembles "a bunch of monkeys" all jumbled together. Another account says it has to do with all the "monkeying around" you need to do with balls of dough to get this dish together!

All that said, it's a mighty tasty treat, and in these days coming into spring, where the evenings are just cool enough to still warrant some sweet-n-toasty baking, it's the perfect thing. You can get Nancy Reagan's recipe at The Food Timeline link, but try mine sometime and let me know what you think. The kids in class were all over it; so much so, I didn't even get a bubble of bread to myself!

FOR THE BREAD
1/4 cup warm water
pinch of sugar
1 package yeast (2 1/4 teaspoons)

3/4 cup warm milk
2 tablespoons butter, room temperature
1 egg
1/4 cup sugar
1 teaspoon salt
3 1/4 cups all-purpose flour

FOR THE COATING
1 stick butter (8 tablespoons)
1/2 cup chopped nuts (pecans or walnuts work best)
2 teaspoons ground cinnamon
3/4 cup light brown sugar

FOR THE ICING
2 cups powdered sugar
1/4 cup milk

Spray a Bundt pan with cooking spray and set aside. Spray a medium bowl with cooking spray and set aside.

Put the warm water and a pinch of sugar in a small bowl. Sprinkle yeast over top and allow to dissolve and get foamy (about 5 minutes). In the bowl of a stand mixer fitted with the paddle attachment, place milk, butter, egg, sugar, and salt. Combine yeast mixture and mix well on medium for about 1 minute. Change to dough hook and add flour, kneading for about 2 minutes. (To do this by hand, combine yeast mixture with milk, butter, egg, sugar, and salt using a wooden spoon or spatula. Add flour and mix well with hands. Turn dough out onto floured surface and knead by hand for 5 minutes.) Place dough in oiled bowl, wrap with plastic wrap, and set aside. Allow to rest in warm place for 20 minutes.

Make coating: Melt butter in small bowl and set aside. In a separate bowl, combine cinnamon, nuts, and sugar. Sprinkle 2 tablespoons nut mixture into bottom of Bundt pan.

Cut dough into 1/2-inch pieces and roll into balls. Dip balls in butter, then nut mixture, and place in Bundt pan, layering as you go. Wrap pan in plastic and set in warm place to double in size (about 1 hour).

Preheat oven to 350 degrees F. Bake bread for 30-35 minutes. Allow to cool in pan for 15 minutes, then turn bread out onto wire rack. Cool another 20 minutes.

Make icing: In small bowl, stir milk into powdered sugar until there are no lumps. Drizzle over bread and serve!

NOTE: In the interest of time during class, we eliminated the 1-hour rising time in the Bundt pan, and our monkey bread still came out perfectly crispy on the outside and soft, warm, and sweet on the inside!

April 3, 2010

Cooking School: Shortening vs. Butter

I am a sucker for the check-out aisle baking magazines. My favorites are the Better Homes & Gardens Special Interest Publications, like Ultimate Desserts (on sale starting last month). But upon purchasing and studying this "bookazine," it left me wondering why so many cookie recipes in it called for shortening. As a cake decorator, I am stumped by the fact that so many of my brethren choose to make "Criscocream" frosting instead of real buttercream. Cheaper, I'm sure, but way too synthetic for my book. I do like going halfsies in pie crust. (See my post Pie Crust Primer for the perfect pastry crust.) But my affinity for using vegetable shortening in cooking and baking pretty much stops there. I'm all butter, all the way after that.

So I decided to do some research into why the BH&G kitchens use shortening sometimes instead of butter in baking, especially with cookies. Camilla at Enlightened Cooking investigated the dilemma in depth in this post. Butter naturally contains water and shortening doesn't, so shortening yields a higher, lighter texture and butter generates a flatter, crispier little number. But if it's flavor you're really going for, stick with butter. You'll notice the difference. She also conducted a comparison test using her double chocolate cookie recipe, which proved that although the shortening version had a lighter, puffier texture, the butter version was tastier and more flavorful. I guess it's really just what you go for in the end (or perhaps what's stocked in your fridge or pantry!).

My recommendation would be, as she suggests in her post, to make note of how much a role the butter plays in your recipe and go from there. If it's a central role (1 stick or more), you may want to go with butter. That much butter in a recipe means to be part of the flavor profile as much as the structure. Also, there's nothing wrong with going halfsies on buttercream too, if you're needing to save a buck or you notice your audience actually prefers Criscocream. That's what the grocery stores use, and sadly, what some people are used to these days. Real buttercream might throw your group for a loop, believe it or not!

March 21, 2010

Cooking School: What's the Deal with the Easy-Bake Oven?

I have always been intrigued by this machine. I wanted one so badly growing up, but my mother was a purist and believed in the big bad oven and teaching us how to use it. She did borrow one from a friend's kid for a summer to appease my interest. I remember being so anal as to actually slice the cakes into perfect portions to give to my family. Yes, there is something so fascinating to young bakers about cooking food with a 100-watt light bulb.

Since spending time with my nieces this weekend, who just got one for Christmas, I've started wondering about it all over again. I simply need to understand how this stuff works with the simple heat of a light bulb! After much Googling, I learned that no one really can say how it works, except that it does. NPR went so far as to conduct a gourmet cooking face-off with two industry notables, Caprial Pence of PBS cooking show fame, and Oprah's chef, Art Smith. Wikipedia and About.com both chronicle the efforts of the toy companies who've owned the Easy-Bake patent over the years. None of these resources really explain how a 100-watt light bulb can bake a wild mushroom flan. But it does! I would need to consult an engineer, but my best guess would be the ratio of heat to space. If you stick a light/heat source of that magnitude into a less-than-a-cubic-foot space, it'll probably cook anything!

I'm glad the Easy-Bake Oven is still around and entertaining kids across America. Hopefully, now that gourmet chefs' recipes can be executed in them, it will encourage wee ones everywhere down the path of culinary success. I hope to have that influence myself here in the coming weeks, as I've just accepted an opportunity to teach baking and pastry arts at a local youth center for the spring term of its after-school program. I won't be Easy-Baking, that's for sure, since the goal is to teach these kids really cooking and baking with a convection oven and electric stand mixer. But I'm very grateful for the opportunity to be a part of their learning process. I am truly enjoying my change in career, and I'm looking forward to helping Chicago youth choose this avenue right out of the gate!

March 4, 2010

Cooking School: Feeding a Crowd

Many apologies for the delinquency in posting anything new. I am working on a few ideas, but it's been a bit nutty sitting down to write these days. One of the things I often hear about from people is how difficult it is to plan multiple components to a meal and pull it all off at the same time. I must admit, I struggled with my efficiency in the kitchen until I went to culinary school, which in itself is an education on constant multitasking.

I recently took a cooking class at Chicago's Chopping Block, and the chef was so organized, he scared me. But in a good way! One of the things he pointed out is how in our minds, we think dessert should be done last. Well, that's the way we eat it, but when prepping for a party, you should actually do it first. It is typically one of those things that requires resting or rising a batter or dough, chilling something or the other, baking time, and cooling time. Probably the most time-consuming portion of the meal! So do it first and utilize the resting, baking, cooling, and all-around sitting-around-and-waiting-for-the-next-step slots in your schedule for other things.

Before you shove off, take a look at all your recipes and look for line items such as these, and when something is sitting around and doing nothing, do something else. If you need to bring things to room temp before working with them, then chop vegetables, shred cheese, or simmer or saute something in the interim. If something's gotta chill, then put something else in the oven during that time.

And it's OK to "cheat" with some prepared foods. Get the sliced mushrooms, canned diced tomatoes (no-salt-added versions are the best), shredded carrots or cheese, peeled and deveined shrimp--you name it. The possibilities are endless these days at the grocery store, as more and more food manufacturers are realizing you want to eat healthier and are less likely to buy preservative- and salt-heavy boxed meals but are more willing to buy prepped fresh food.

I recently put all the items in this picture together in 5-1/2 hours--enough to feed a party for 30. And I did this by simply starting dessert first and utilizing the downtimes for up times. You too can be this organized in the kitchen, and you will be ready for those guests, cocktail in hand, apron on the hook, and delicious food just waiting to be consumed!

January 31, 2010

Cooking School: Pan Addiction

I cannot believe it, but Wilton has managed to pioneer yet another cupcake size.  As if mini, regular, and Texas were not enough, we now have the option of King-Size! These are not new; evidently, they've been around for a couple of years. But they are a new discovery here in Spoonfoolery land. The possibilities are endless! My favorite so far is this "soft-serve cupcake" from Wilton's site.

With these tulip paper liners (all the rage right now; just visit your local Starbucks, and you'll see more than things than you can imagine made with them), this tall cupcake pan certainly makes some cute food!

I must say, I'm addicted to collectible cake pans,, and I just can't seem to have enough varieties to do all the things I'd like to do. Another recent addition is this fun wonder--the Fanci-Fill cake pan--also from Wilton.
It comes in 8-inch and 4-inch sizes, so you could actually tier this for a super-special occasion. I made one big giant Hostess cupcake with this for a dinner party last night, filled with a standard Devil's food cake recipe, chai whipped cream, and melted fudge frosting poured over the top. Sorry, but I totally forgot to get a cross-section for you, but see the accompanying booklet photo above. It does slice very neatly with a complete cross-section of filling.


And you can also do savory with this; the recipe booklet has a "rice cake" of sorts, where you put whatever you planned to serve with the rice you just made inside the "fill" part of the cake pan. A new way to serve Indian food? I think so!

But all humor aside, baking pans, which ones to get (nonstick or commercial metal), and many other construction details befuddle home bakers nationwide. A friend from my Boston days recently asked me what was my preferred cookie sheet--the flat, insulated kind with the two upturned lips or jelly-roll style?


I prefer the jelly roll style, nonstick. They are much easier to remove from the oven with their surrounding lip, and they serve multiple purposes: cookie sheet, bar cookie pan, and cake pan. Chicago Metallic makes an excellent version, in a commercial-grade uncoated metal. With parchment paper, it's just as nonstick as nonstick, without the horrible burn factor that nonstick often unwittingly includes. I am rather against nonstick coating in cooking and baking in general (What is that stuff, and I just know it is getting in your food!!!), and I do think it instigates extra browning on the bottoms of your cookies more than it should. And I'm a big fan of parchment paper, as I really believe it's the only thing that's truly nonstick in this baking life.

However, sometimes you can't get away from nonstick coating. The Fanci-Fill pan I just bought and fell in love with has nonstick coating, as do many of my layer cake pans. But I always apply cake release to the pan and line it with parchment (also applied with cake release) to ensure things really don't stick (and to hopefully avoid little Teflon bits getting into any precious crumb).

Here is an excellent recipe for cake release that I picked up at a cake decorating convention last summer. You can make this in small batches and store in your dry-goods cabinet for up to 3 months.

Cake Release

4 tbsp shortening
4 tbsp neutral oil such as vegetable or canola
4 tbsp all-purpose flour

Mix thoroughly until no lumps. Apply to cake pans and/or muffin tins with pastry brush. Store in an airtight container in dry area at room temperature for up to 3 months.

Happy panning!

January 18, 2010

Cooking School: Stocking Your Pantry

For today's post, I dug back into my cookie jar of comments from friends regarding my last blog. A friend from high school who lives and works in the D.C. area and has probably the busiest schedule of anyone I know asked a really great question: How do you put together a fun meal for friends when you have nothing in the fridge or pantry?

My first answer would be, order a pizza! But then, if you think about it, most people do get more creative when they're down to the bare bones of what's available at home. I once managed to put together a taco salad with the remnants of someone's pantry when even he had no clue his kitchen offered up such fare. I think it is when you're down to nothing that you can really get your game on!

The folks at OChef offer a nice comprehensive list of the ideal pantry, and in a perfect world, we'd all have this stuff lying around to whip up into something great when throwing an impromptu party. But really, if you've got a can of diced tomatoes, an onion, a lime, and even just garlic powder and salt, you've got salsa. I would say most people tend to have tortilla chips around the house, but even if you just have a stack of flour or corn tortillas, even those can be turned into chips in a hot oven in 10 minutes. Instant chips and salsa! Or, you can go a step further if you have shredded cheese and maybe a can of chili in that cupboard somewhere--oven nachos, one of mine and my husband's favorite dinner-and-a-movie menus.

Say you've got a box of spaghetti and two or three tomatoes, and maybe, just maybe, if you're lucky, there's a container of grated Parmesan from your last big Italian production. Nothing makes a better summertime dish than pasta with fresh tomatoes and a garnish of Parmesan. And remember, you can always make an unplanned get-together somewhat planned by asking folks to bring something. Even if you prefer homemade, a lot of people are quite willing to stop by the grocery store and pick up something ready-made.

Here are some other fast equations to calculating an impromptu party spread:

Box of instant pudding + thawed whipped topping + sliced bananas, apples, pears, etc. = fruit dip tray
Potatoes + cheese + deli meat + sour cream = TGIFriday's-like potato skins
Sour cream + dill, parsley, and garlic powder = homemade ranch dip for random veggies or potato chips
Ice cream + cookies = ice cream sandwiches

I suppose you do actually need something in your kitchen to get started, so if you really truly don't have anything, then maybe the pizza guy will have to come to the rescue, but I'm a big believer in stocking the kitchen forever and always with at least some of the following: pasta, canned tomatoes and black beans, shredded cheese (which keeps in the freezer for what seems like forever), sour cream, apples (Granny Smiths and Red Delicious keep a long time in the fridge), flour tortillas (also freezeable), and seasonings such as garlic powder, basil, oregano, cumin, and cinnamon. Our house is never really without ice cream, so we always have an instant dessert around here. And with all the two-fer deals grocery stores are always having on those, there's no real reason any home should be without it, I think!

Well, here's to a better-stocked 2010. Eating at home is always better for you than eating out (saves moolah and calories!), so I hope this little pantry primer helps you make out better with what you might already have!

January 7, 2010

Cooking School: Defining Buttercreams

What is buttercream frosting? Well, what it's not is the stuff you see slathered on cakes at the grocery store or in the tubs on the Pillsbury/Betty Crocker aisles. Those versions are made with shortening or other vegetable-based oil suspensions and cannot legitimately be called buttercream. But what does qualify as such contains plenty of butter and sugar, sometimes milk and vanilla, and in European versions, eggs.

A good friend and former co-worker who is nurturing her young tween's growing interest in pastry asked me an awesome question yesterday: What's the difference between all the various buttercreams--from back-of-the-Domino-sugar-box (my personal favorite) to the ones that use eggs? Let's take a look...

Here is an excellent buttercream primer. The folks at PastrySampler.com define all the various ones and provide recipes for all of them. My take is that Swiss Buttercream is the easiest of the European buttercreams, tastes the best, and covers cakes marvelously. I use PastrySampler's standard Buttercream Icing for cupcakes. It's also good for adhering fondant to cakes.

I'd add the following notes of interest to PastrySamplers's definitions for buttercream:
  • Store-bought icing can be used for decorating (roses, piping, and other pastry bag techniques). Just add powdered sugar to achieve proper consistency for piping (flowing) or roses (stiff)
  • Filling is often qualified as whipped ganache, mousse, or custard, although another layer of buttercream between your cake layers works just fine. If using fillings with runnier consistencies, pipe an icing dam around the edges to hold the filling in before the weight of the next layers go on top. 

  • Because the European buttercreams use eggs, it's best to frost cakes with them when you know refrigeration afterward will be readily available. 
  • Bring frostings to room temp before working with them via pastry bag, otherwise you'll be arthritic before your time!
  • Making frostings of any type is easy with an electric handheld mixer or stand mixer. The key is to whip plenty of air in there, which is not always done sufficiently by hand. If you have neither and need to make frosting, may I suggest a bundt cake with powdered sugar glaze instead? (Sorry! I'm a bit of an electric mixer snob; it is a godsend in the cake baker's kitchen.)
Domino Sugar also provides an excellent how-to on frosting. Between this and PastrySampler, you'll be frosting like a pro in no time!

December 8, 2009

Cooking School: Pie Crust Primer

This weekend, I stumbled across some old questions friends had posed when I had another incarnation of this blog several years ago. One of my best friends in Atlanta posed this question: "Why is pie crust so hard to make? Grocery store crusts taste better than my slop!"

All I could think was, "Oh no. Don't go the supermarket route!" Those are filled with preservatives, made with all shortening and no real butter, and full of salt to give them shelf life. You can master pie crust this holiday season, and here are a few tips for obtaining a good, workable, flaky pie dough. (I'll tackle nut and cracker/cookie crusts that require parbaking another time.)

This recipe from Epicurious is pretty foolproof. I replace half the butter with shortening to give it superior flakiness. Some people replace it with lard, but I just can't use that part of an animal (maybe it's the Hindu in me again???), so I'm fine with shortening. I do think it adds texture and allows the flaky layers to form better than an all-butter crust does.

Don't make the crust unless you're really going to use it within the allotted time. Chilling for an hour is perfect. If you think you can't get to it the day you make it but still want to cross the task of handmade crust off your list, then form the disc, wrap it twice in plastic wrap, put it in a freezer-safe Ziploc (label and date it!), and freeze it until you use it. Transfer it to the fridge first before using it because you want it to return to that "chilled-for-an-hour" temp (usually overnight works fine). If the pan-ready pie crust is your thing, then buy these glass pie plates that you can even get at CVS and Walgreens, roll out your dough after the hour chilling time, place it in these plates, lay waxed paper or parchment between each plate, stack and wrap them, and then freeze them in a Ziploc bag. You'll even have reusable glass pie plates, and they're sturdier for transport to a party than foil ones.

You can also go whole-grain on this pie crust recipe. I replace about half the flour with whole wheat pastry flour when going for a somewhat healthier or rustic slant. I do think it's crucial to use pastry flour and not just simply whole-wheat flour, otherwise you won't have the pliability you'll need for pie and tart dough. Here is a great guide on all the flours so that you can better understand gluten content and how it works in certain doughs.

I am also a fan of the silicone rolling pin for working with pie dough. Because of the high butter content, you'll want to make sure the dough doesn't stick to your pin. Flour your surface well, then flour your disc of dough. Roll with even pressure and turn the flattening disc often. Reflour your surface as necessary. I often pick up the widening circle of dough on opposite ends and circulate it, in a rather "Mr. Miyagi/wax on, wax off" way, so that I know it never sticks to my rolling surface. Wooden straight and French-style rolling pins are also great, and I got used to using one in pastry school. Just remember not to wet-wash it. It's wood and will rot and splinter if in regular contact with water. For cleanup, just allow buttery bits to dry and then scrape off with a dry, rough-surface towel or bowl scraper. This is one reason I really like the silicone pins. They offer the same even weight as a French wooden pin, but with an easy-to-clean surface. Just keep it away from knives, box graters, and other pointed surfaces when you store it, so as not to tear up the soft silicone surface.

Lattice-top fruit pies are just about the prettiest things on the planet! But lattice work takes some practice, in my opinion, so an easy way out is to use small shaped cutters. The end result is a pretty darn beautiful pie that still has the venting needed for the water in fruit pies to escape during the baking process. Scraps of leftover dough can be rekneaded and frozen until later use. For lattice-top pies, I will often insert a baking sheet with a lip (jelly-roll pan) on the rack below the pie in order to catch fruit drippings that bubble out over the lattice.

All the best with your pie-baking this holiday season, and just remember, nothing beats homemade pie crust. Really, after you become a whiz at this, the supermarket version will truly pale in comparison!