September 6, 2010

When Push Comes to Chevre...

Goat cheese is a quintessential summer ingredient. It's soft, spreadable, crumbly, tangy, and creamy all at once. A great biography on goat cheese can be found here, but generally, it's known to be lower in fat and higher in vitamin A and potassium than cow's milk. Also, people who have a lactose intolerance for cow's milk find goat milk products easier to digest.

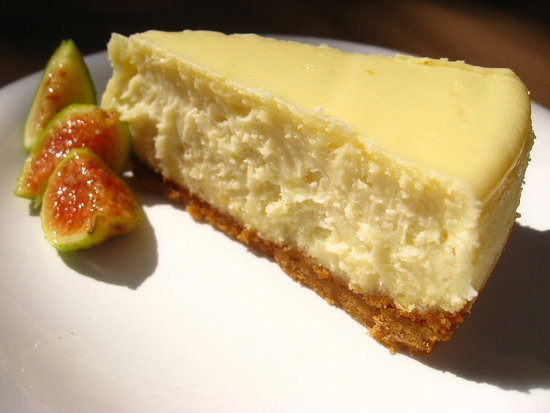
Our household is unfortunately undergoing a bit of a tolerance regime change in our older age, but we're also nuts for cheesecake and pizza around here. So this summer, we tried our hand at pizza with goat cheese (superb!) and this weekend--a goat cheese cheesecake! It still had plenty of other cow's milk products in it (mascarpone and cream cheese), but because those ingredients were cut down to make way for the flavor boom that is goat cheese, our bellies and our palates were quite satisfied. I served it buffet-style with three sauces: seedless raspberry port wine sauce (8 ounces of seedless raspberry jam simmered in about a cup of sweet port wine), my hot fudge sauce, and a beautiful, silky butterscotch sauce. (I'll include that another day, otherwise this blog entry will be too long to bother with!)

The key is to make sure all your cheeses are room temperature, otherwise you'll suffer with lumps. I did not add sugar to the crust either. I felt with the amount going into the filling plus the sauces, it was not necessary. If you like a sweeter crust, start with 1/4 cup granulated sugar and try it once that way. If you think it needs more, go up to a half cup next time. Also, the original recipe called for a vanilla bean split and scraped, but I save my vanilla beans for things that need steeping in cream or milk, like ice cream and chocolate truffles. I prefer using vanilla bean paste when it's part of the presentation that we actually see the vanilla flecks. It's cheaper than whole vanilla beans and more concentrated than extract, so it provides the overall effect I'm looking for without too much expense. Last but not least, I used a water bath with this one, which I generally don't because most of my cheesecakes have some sort of topping that masks the cracked top that occurs when baking cheesecakes. Doing a water bath is not hard and is well worth it for a party-worthy presentation!

As we hang onto these last days of summer, I'd highly recommend putting your springform to work on a new kid in town. Your tastebuds will thank you!

Goat Cheese Cheesecake (adapted from The Last Course, by Claudia Fleming)

2 cups graham cracker crumbs
1/4 to 1/2 cup granulated sugar (optional)
1/2 cup (1 stick) unsalted butter, melted

12 ounces cream cheese, room temperature (1 1/2 bricks)
8 ounces fresh goat cheese (1 large log or two small ones), room temperature
1 cup sugar
1 tablespoon vanilla bean paste
1 1/2 cups (12 ounces) mascarpone cheese, room temperature
4 large eggs, room temperature

Preheat oven to 350℉. In a large bowl, combine graham cracker crumbs and sugar (if using), and mix well. Add melted butter and stir until combined. Press evenly into bottom and sides of 9-inch springform pan. You will use all your mixture. Bake for 8 minutes until set. Remove from oven to allow to cool and reduce oven temperature to 325℉.

In a separate large bowl, combine cream cheese, goat chese, sugar, and vanilla paste and beat with an electric mixer until smooth and creamy, about 3 minutes. Add the mascarpone and beat until smooth (another 1-2 minutes). Add the eggs individually, scraping down sides and bottom of bowl after each addition. Scrape bottom and sides of bowl one last time and mix well for 30 seconds.

Tightly wrap outside of prepared pan with aluminum foil, making sure there are no gaps. Pour mixture into pan and place in center of a larger baking pan with at least 2-inch sides. Pour enough hot water into the larger pan (not your cheesecake!) to reach two-thirds up the side of the springform pan. Cover the entire baking pan with foil and pierce in several places to allow for steam release. Bake 1 hour, then lift off a corner or two of the foil for additional steam release, and bake 50 minutes longer, or until cheesecake looks set around the edges but is ever-so-slightly jiggly in the center.

Transfer cheesecake to a wire rack to cool completely, then chill in refrigerator at least 3 hours before serving. Cheesecake can be made up to two days ahead and will keep, refrigerated, for about a week. Serves 12-16 pretty darn generously! Serve with sauces or seasonal fruit.

August 30, 2010

The Sugar Art of Learning

Many apologies for my lack of presence here. It's been one crazy summer (wedding season for a pastry chef always is), but I did manage to cram in a little continuing education for myself last week in Atlanta at the famed International Sugar Art Collection. I've taken classes with Chef Nicholas Lodge here in Chicago at my alma mater, The French Pastry School, and I have longed for an opportunity to go to his school down south and learn from the master of sugar artistry. You've probably seen him on Food Network, where he often serves as a judge for Wedding Cake Challenges and other cake-oriented insanity cable television is notorious for. But a day or two (or four, in my case!) in his classroom is like Cake Artistry 101, 201, 301, and 401 all at once! I learned more about recent fondant and gumpaste trends than I ever would struggling at home with books from Amazon. Well worth the trip and tuition!

Here are some of the all-stars from my four days there. See the captions in the Flickr roll for a description of the type of sugar artistry used in each example. I am excited about being able to offer these elements for cake orders going forward. Care to place an order??

July 31, 2010

Have a Ball!

Cake balls/pops/truffles/etc. seem to be all the rage these days. People have been asking me for some time what the next big thing after cupcakes will be, and I think this may be it. Bakeries all over the country have started offering them because they help make use of "cake droppings," as I like to call them. These are all the cake crumbs you're left with after a week of leveling cakes for stacking, filling, and frosting.

Basically, you take a 9" x 13" cake pan full of crumbs, add about 2 cups of frosting (perhaps less, depending on how moist your initial cake recipe is), squish it all together, and make balls about 1-2 inches in diameter. Freeze them individually on a sheet pan for 20-30 minutes and dip in tempered chocolate or chocolate coating. They're really cute on miniature cupcake liners, all boxed up and ready to go for party favors, hostess gifts--you name it!

Bakerella has made cake pops a worldwide phenomenon through her blog and now soon-to-be published book. These take a lot more effort but are probably worth it in the end. I can imagine the reaction you'd get from your crowd! Check out her site and view her amazing gallery of cake pop artistry. The first time I made them, it was more of a deliberate effort. The client wanted them to start with, so I had to bake a cake from scratch (because that's how I roll), crumble it up, make the frosting (because I just don't do canned frosting of course), and mix it all up for the ball "batter." It seemed like a lot of labor to basically have something mini-cupcake-sized anyway. I didn't quite get what the hubbub was about, but knowing its the best way to make use of "cake droppings" these days helps you feel more sustainable in today's waste-conscious society. You can even freeze your cake crumbs for up to 3 months and use them as needed.

I recently made a bunch of cake balls and debuted them at my book club. For years, these wonderful folks have been my test kitchen, and I have soooooo appreciated them for that. Everyone loved them and thought they were one of the best desserts I've brought to a meeting. One longtime clubber actually came up with the name I'll be using to add them to my menu: Bomb-bons! Very sassy and the perfect thing to call something that packs that much of a sugar punch!

So if you're interested in Bomb-bons a la Pomegranate Sweets & Savories, give me a call or visit my site to order some. I'll be posting the available flavors each week. This week, I'm featuring Grandma's Chocolate, Carrot, and Vanilla Buttermilk. And maybe, when Bakerella's book comes out, it might inspire me to work on a pomegranate-shaped one I can call my signature Bomb-bon!

July 19, 2010

Cool Tools: Butter for Brains

I have discovered the whimsical world of Worldwide Fred. Talk about pan addiction! I recently purchased a few pans that have me so excited about what I can do with them, I can't stop thinking about them...

For example, the Brain Freeze set at left, first and foremost for ice, can also double for Jell-O jigglers, panna cotta, and butter! Imagine that served up with your daily bread! I'm even going to try them with melt-and-pour soap base this week and see how those turn out. I could call them Smart Soap...

I also recently purchased the Worldwide Fred Cakewich pan. I haven't made anything yet, but the possibilities are endless, even on the savory side. It comes with a recipe for a vanilla pound cake, peanut butter frosting, and berry compote. But I'm thinking you could even do your favorite white bread recipe with just about any kind of fixings and serve up a big sandwich for the cutting!

All jokes aside though, it's good to always investigate all the possibilities of your novelty pans. I have a fetish for them, so goodness knows I don't always follow this rule of thumb. But I do have a dozen-cavity miniature egg pan from Williams-Sonoma from years ago that not only makes good eggs (no pun intended), but bumblebees, ladybugs, and hedgehogs too. (Wilton makes one too, with only eight cavities though.) The Nordicware baby Bundt pan can make pumpkins, apples, and all sorts of round seasonal shapes (see right). Heck, Bundt pans in general do a lot of things besides your average Bundts. Try this caterpillar cake design some time!

July 1, 2010

S'more Than Enough

I think there's an undeniable fascination going on with the graham cracker + marshmallow + chocolate thing. I have seen s'more options for making s'mores-type goodies this summer than ever before. Having been a Girl Scout who enjoyed my fair share of camping trips and campfires, I adore them! What is it about oozy, chocolatey goodness with a rustic whole-grain crunch? And now, s'more than ever, there are so many ways to work this ooey gooey equation into summer desserts. (OK, I'll stop with the s'moring now...)

Here's a little background on these goodies... The term s'more comes from the phrase "some more"--a typical request when the treat became a regular around the campfire. This article details some history on the s'more, indicating that the first real recipe was cited in a Girl Scout handbook in 1927. Marhsmallows were an easy-to-transport item along a hiking trail and warmed up nicely over a campfire. Chocolate bars and graham crackers were also just as portable, and so all these items came together in a sticky sweet treat that became synonymous with the great outdoors.

Lately, more varieties of desserts have oozed onto the scene, using these three elements, only in different ways. This cookie recipe from Martha has me wondering whether a "graham-like" cookie would be more satisfying than a graham cracker. They sure are cute little buggers and would make a great presentation at a winter tween slumber party, when you need to fake a campfire with your good ol' gas oven. (Pretend the pilot light is your open flame.)

Or if you really wanted to go all-out Martha, you could seriously impress your friends by putting together one of these for a weekend getaway: the S'mores To-Go Box! Real homemade marshmallows are included in Martha's version. I must admit, once you've had a homemade one, it's hard to go back to ye ol' store-bought Kraft marshmallows. There is some sort of melt-in-your-mouth madness going on with homemade versions that beckon you to their side. You've got to try it at least once before you knock it. It's not a time-consuming task, but without the preservatives that store-bought ones harbor, just remember that homemade doesn't last as long. The major plus though is that you can flavor them any way you like. I put strawberry Nestle Nesquik or cocoa powder in mine and sometimes mix them up for holiday gift-giving in a sort of Neapolitan pack.

But so far, my favorite rendition of this classic treat has been the s'mores brownie with marshmallow ice cream concoction I put together a few weeks ago for an impromptu dinner party with friends. It starts with this brownie recipe from the Food Network, topped with chocolate buttercream, and accompanied by a scoop of marshmallow ice cream. I eliminated the marshmallow topping in the brownie recipe and served a chocolate-frosted brownie with a scoop of marshmallow ice cream on the side. Of course this one can't be passed around a campfire on a camping trip, but it sure can make a rather metropolitan spread feel like a campsite. Just play your nature sounds alarm clock in the background while you plate it up!

August 10 in National S'mores Day, so you have some time to experiment on which of the above you'll treat yourself to that day. That's s'more than enough time!

June 17, 2010

Sweets & Snacks Expo 2010

For the first time in my life, I'm involved in a line of work that has conventions! I loved going to them with my dad as a kid.  He was a surgeon, and so I'd end up wandering around these medical convention expos with him, grabbing free socks and backpacks, emblazoned with some medical research or drug company's name. We always had a bevy of pharmaceutical company pens and Post-It notes in our house, along with our fair share of t-shirts bearing fungal cell structures and other medical oddities you wouldn't even be caught mowing the lawn in!

But now I'm in a field where I get to attend things like the Sweets & Snacks Expo, which was held at McCormick Place in Chicago on May 24-27. This is the candy and snacks industry's chance to justify the purpose of high fructose corn syrup, monosodium glutamate, and maltodextrose in your diet. I think I acquired diabetes by just walking in the door! Nonetheless, I had a great time and learned a lot about the snack industry, like how Frito-Lay is becoming one of the greenest snack producers in the world, with compostable packaging and by using recycled water and solar power in its plants. Or that there will now be a line of Fancy Nancy Sweethearts candy and that Pringles has gone multi-grain.

We are not big snackers in our house and tend toward simple tortilla chips and a good homemade salsa or a bowl of cereal to tie us over between meals, but it was fun to see all these vendors in one place and to bring home everything from chocolate-covered Peeps to chewy Lemonheads. As a cupcake baker always looking for the right topper, it was heaven on Earth! I also experienced yet another celebrity sighting, at least in the cupcake-baking world. Authors Karen Tack and Alan Richardson, of Hello Cupcake! fame, were in full cupcake-demo swing, showing conference goers how to make cupcake toppers out of anything from Kraft caramels to Nutter Butters. They are just as jovial in person as they come across in their books, and like the big cookbook nerd that I am, I returned the next day with both my Hello Cupcake books for them to sign. I also saw the mayor, who I've heard is not even really an eater, much less a snacker, but that was good PR for the city for him to show up, even if he doesn't so much as pop a Hershey Kiss in his mouth. More people attended this year's show than any other Sweet & Snacks Expo in history and there are more candies, sweets, and snacks being produced worldwide now than ever before. (So much for healthy eating!) In fact, at one time, Chicago was the biggest candy producer in the world; now it's Denmark. Not sure how that transition happened--maybe Denmark wanted to be known for more than just a breakfast pastry.

Take a look at my photos on the Spoonfoolery Photostream. You'll see some general high-fructose insanity, like the Native American headdress made entirely out of candy and a Mona Lisa mosaic constructed with Jelly Bellys. And then maybe you'll want to go eat a big salad because your blood sugar will have spiked just looking at this stuff!

June 10, 2010

Oh, the Places You'll Go!

Last week, I finished my first full term as a baking and pastry arts instructor. It was a dream job with a textbook start and a photo finish. I couldn’t have asked for a better experience post-corporate America. A year ago, I finally walked away from the cement wall I’d banged my head against for 15 years and plunged head-first into a career as a baker and pastry chef. On June 2, as I met all the parents at the pizza banquet my students had slaved all afternoon to make (totally and completely from scratch, including doughs and sauces!), I was never more thankful for my one-year-old decision.

Teaching is so satisfying. I loved watching their minds swell with baking knowledge over the weeks of our program. To see them, just 3 months ago, unable to wrap their brains around the concepts of yeast and how it activates bread life, to happily kneading pounds and pounds of pizza dough and knowing how to handle a rolling pin—well, it just warms the cockles of my heart! We began in March with the simplicities of blueberry muffins and cornbread. Along the way, they learned how to make cinnamon rolls, frost cupcakes, and bake brownies. They hand-rolled chocolate truffles and assembled caramel pecan turtles. They went from England (scones) to Italy (pizza dough), and on our last day, they planned and executed a banquet welcoming their parents to our kitchen. My pastry queens!

And the pizza banquet was a HUGE hit! We made classic pizza dough with a homemade pizza sauce and plenty of fun toppings, along with a salad trimmed right from the youth center’s rooftop garden. We finished everything off with a dessert pizza, assembled with a cookie dough crust, a vanilla yogurt and cream cheese “sauce,” and lots of fresh fruit, with chocolate sauce drizzled over the top. Parents were satisfied, and the kids were quite proud of their work. Considering so much was made from scratch, it would be hard to share all the complete recipes here, so I will meet you halfway and give you my infamous dessert pizza recipe. I've been making it for years--a great dessert staple, with backyard barbeques, and the celebration of youth and the whole learning process upon us this graduation season.

Dessert Pizza

Cookie Dough Crust

3 cups all-purpose flour
1 teaspoon baking powder
1/2 teaspoon salt 
2 sticks butter, unsalted, softened (8 oz)
1 cup granulated sugar
1 large egg
1teaspoon vanilla extract
dash of almond extract

Sift together the flour, baking powder, and salt. In a mixing bowl, beat the butter and sugar until light and fluffy. Stir in the egg and both extracts.

Slowly add flour mixture (1 cup at a time) and stir until incorporated. Form the dough into a disc and wrap in plastic wrap. Refrigerate for at least 1 hour.

Preheat oven to 375 degrees F. Press the dough out onto a parchment-lined 12-inch pizza pan. Bake the cookies for approximately 12-14 minutes or until the edges begin to turn golden brown in color. Remove from oven and allow to cool completely.

Yogurt-Cream Cheese Sauce

2 8-oz packages light cream cheese, room temperature
1 1/2 cups lowfat vanilla yogurt
Powdered sugar to taste

Blend cream cheese and yogurt in the bowl of an electric mixer until smooth. Add sugar by tablespoonfuls until desired sweetness. Chill 30 minutes before spreading.


Hot Fudge Sauce

3/4 cup semisweet chocolate chips
3 tablespoons unsalted butter
1/3 cup heavy cream
2 tablespoons sugar
1/3 cup light corn syrup
1 teaspoon vanilla extract

In a microwave-safe container, heat the chocolate and butter in the microwave on half power in 30 second intervals until melted. Set aside to cool.

Heat cream in medium saucepan over low heat. Add sugar and corn syrup and stir until sugar dissolves completely. Add cream mixture to melted chocolate and return to pot. Continue to heat mixture over low heat, stirring constantly. Add the vanilla and pour into a small pitcher.

To assemble pizza, spread yogurt-cream cheese sauce over cookie crust. Sprinkle with assorted fruit (pineapple chunks, strawberry and banana slices slices, blueberries, mandarin oranges). Drizzle with chocolate sauce. Slice into squares and serve!