February 1, 2011

For Perfect Roast Chicken, Get Yourself a Brick

The next must-have kitchen gadget isn't at Sur La Table or Williams-Sonoma. It's at Home Depot.

This isn't to deny my affection for fancy kitchen implements. The only way you'd take away my Le Creuset Dutch oven is from my cold, dead hands! But I must confess my adoration of the humble brick. I owe it my gratitude for its role in helping make the most flavorful and moist roast chicken I have ever made.

I take roast chicken seriously. There's perhaps no better test of a cook to get it right. It's simple, but not easy. Two things usually foul (fowl?) up roast chicken. The first is insufficiently brown, or worse, rubbery skin. A more glaring fault is dry, stringy breast meat. That's because chicken breasts, like those of other birds, cook more quickly than the legs and thighs. By the time the latter cook completely, the former too often have entered shoe leather territory.

A brick (and pair of sturdy scissors) address these shortcomings. You'll need the scissors, or a sharp knife, to remove the chicken's backbone—an easy feat that will take no more than 1 minute—so that it lays open like a book. The brick forces the chicken flat, ensuring even cooking. In 45-50 minutes—much less time than conventional roasting techniques—you'll pull a perfectly cooked bird from the oven, with the requisite crisp, golden skin to match.

A note about the chicken itself: I highly recommend the Empire kosher brand, which I find at Trader Joe's. I won't pretend to be an expert on kosher slaughter techniques, but I know the process involves salting the meat, a practice that boosts flavor and helps the chicken retain moisture. (You can achieve the same effect by soaking your chicken in cold salted water, a procedure known as brining. Click here for a primer.) I give the chicken an added boost with a marinade of equal parts lemon and olive oil and fresh herbs. Rosemary and thyme are classic chicken-friendly herbs, but tarragon would pair nicely too.

Below you'll find a step-by-step guide to chicken under a brick, or as the Italians call it, chicken al mattone. (It always sounds better in Italian, doesn’t it?)

First, turn the chicken breast down, and with a sturdy pair of scissors, cut along one side of the back bone. Cut from one side to the other. Repeat on the other side of the backbone. The bone will be your guide. (When you attempt this maneuver, you'll see what I mean.)


Next, flatten the chicken with the palm of your hand as if you were mistreating a book. Rub the marinade on the front and back of the chicken. I prefer an all-day marinade, but an hour or two will do in a pinch. Any longer, though, would be a bad idea. The lemon juice may start "cooking" the chicken.


Preheat the oven to 425 degrees F. In an oven-proof frying pan, saute the chicken, breast side down, in a couple tablespoons hot olive oil for approximately 7 minutes. The chicken should be well-browned.


Wrap the brick in foil (see below) and set it atop the chicken, with the chicken remaining breast side down. This will ensure even cooking and perfectly browned skin. Insert pan in oven and roast for 30 minutes. (When my chicken is on the smaller side, around three pounds, I usually roast it for a little less, around 27 minutes.)


Remove the brick and carefully turn the chicken so that it's breast side up. Return to the oven for another 10-15 minutes. (After 10 minutes, I check to see if the chicken is done. Some fancy-pants cooks might advocate use of a thermometer. I prick the leg or thigh with a fork, and if the juices run clear, it's done.)


It's important to let the chicken rest for at least 10 minutes after roasting. As tempting as it looks, resist the temptation to carve into it. Its juices will end up on the cutting board rather than in your mouth. Loosely cover it with foil to keep it warm.


When you're ready to eat, you'll find it easy to cut into serving pieces. I love to serve roasted chicken with crusty bread and white beans, briefly sauteed in olive oil and rosemary. I'll also braise a hearty green, such as kale or Swiss chard, in olive oil and garlic. All complement the simplicity of the chicken so elegantly.


The last step is optional, though highly recommended: This dish, like any meal, is best enjoyed with special company. In this case, it was my equally zesty boyfriend, who just loves this dish.

January 21, 2011

Choux, Choux, Kachoo!

People have often asked me what the next big thing in pastry will be, especially after this crazy cupcake ride we've been on for some time now. For years (and I am not saying this because they seem in fact to be the next big thing), I've been saying it'll be the whoopie pie. Bon Appetit in fact did a feature on this recently, pitting the whoopie pie against the French macaron and having readers vote on which would be the Next Big Thing.

However, I daresay at this point, the cream puff may very well be giving all these sweet treats a run for their money. Cream puff patisseries like Beard Papa's are opening up everywhere, and the lines are out the door! And profiteroles (see the difference between cream puffs and profiteroles here) are appearing on dessert menus in everyday cafes from here to D.C. This holiday season, I catered dessert for a party where the centerpiece was a good old-fashioned French croquembouche.

I recently ventured over to Beard Papa's here in Chicago's Loop to investigate this puff proliferation. Theirs are some seriously large Marges, I must say, and I think French chefs everywhere would balk at the size of these things. Cream puffs, or chouquettes, are true petit fours and should be consumed, by definition, in one or two bites. So the fact that Beard Papa's are like burger buns is a little disconcerting to the average French pastry chef, but at least it makes them good for sharing. I got the standard "eclair" (another thing I had issue with--eclairs are the long "hot-dog-bun-like" puffs; chouquettes are the round, more "meatball-looking" puffs), which was coated in a rather hard chocolate shell for some weird reason. Since Beard Papa's version is neither round and meatball-looking, nor is it long and hot-dog-bun-like, I guess they can call it whatever they want! They are more or less bumpy and hilly, but generous in portion and nice and airy inside. I had some problems with the hard chocolate shell business. That is not at all the way it's done in France. Most typical French-style cream puffs and eclairs have a smooth, thick ganache glaze over the top that's soft and nice and drippy upon biting into them. But I will give BP some kudos on the strawberries-and-cream filling. Yum! Nice touch to add the fresh strawberries to the cream!

The other cool thing about BP is the "Chipotle-style" ordering system. You decide how many you want (single or various multipacks), order your puff (naked or chocolate shell), order your filling, and voila! It's filled fresh right there in front of you, so you're not getting some soggy, day-long-filled blob. It is a low-cost/high-return venture for these folks, so talk about a winning business plan!

Believe it or not though, these are very easy to make at home, and so you should save yourself the bucks and try whipping up a batch. Ina Garten's choux paste (cream puff batter) recipe is ridiculously easy and five-star review on Food Network's site, so you just can't go wrong with it. Use real whipping cream for your filling (no cheating and using that heart-attack-in-a-bowl Cool Whip crap). And when it warms up again, you can make them profiteroles and serve them with ice cream!

December 19, 2010

Cookie Swap!

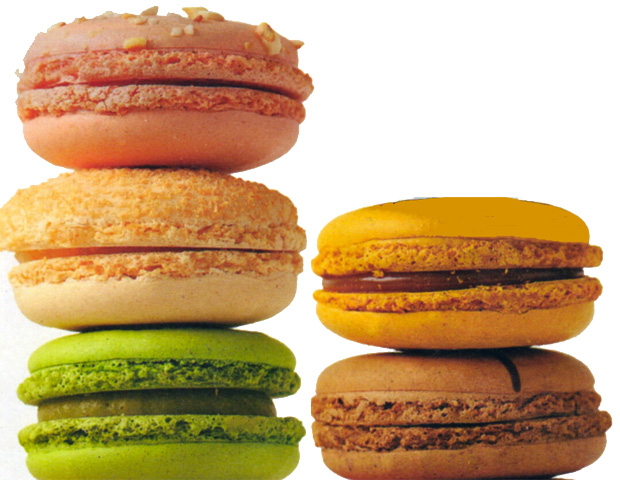
It's that time of year... Cookie Monsters everywhere are baking up a storm, filling pretty tins with delectables, and delivering them near and far. This year, I tested a few new recipes and found some real winners, including getting my French macaron game on again. I hadn't tackled that fussy little task since pastry school and was worried I'd forgotten the how-to, but it all came back to me, and now I'm having a hey-day with them. A macaron obsession, if you will, thinking about all the unending possibilities of flavor combinations! Here are some solid staples you might want to try in these last days of baking before Christmas...

Fine Cooking's Orange Butter Cookies with Grand Marnier Glaze: Soft, buttery orangey cookie with a tasty even-orangey-er glaze! You can substitute Triple Sec for Grand Mariner to cut costs. The flavor effect is about the same. The butter cookie recipe is also a great basic roll-out recipe for any other flavoring, including lemon or lime. The use of yolks instead of the whole egg give the dough a nice, pliable feel and a golden color.

Chocolate Caramel Bars from Martha Stewart: If you're not planning to transport them elsewhere for presentation, follow the recipe and make them in bar format. Use a hot, wet knife to make clean cuts, and definitely make sure you leave extra parchment hanging over the pan's edges in order to pull it out of the pan and lay it flat on your cutting board. However, if you do want a neater, cleaner presentation, this filling works great in small tart shells or between two butter cookies. You could use the Fine Cooking recipe above, but leave out all the orange flavoring (or keep it, if you go for that chocolate-orange zest appeal!).  One note of caution though... Martha's editors fail to tell you how to caramelize sugar for real. The extra water in this recipe wreaks significant havoc on the caramelizing process, I must say. This online tutorial on caramelizing sugar without water is excellent and will give you the confidence to make caramel any ol' time!

Nielsen-Massey's Chocolate Chip Cookies: This recipe is absolute perfection time and time again. It doesn't matter the mixer, the oven, the altitude, the humidity, whatever... They are perfectly soft and chewy in the center and crispy around the outside. I actually leave out the cream of tartar. This description gives you the reasons for cream of tartar in recipes, but quite honestly, I don't know the purpose of it in this one, as it already contains baking powder, which is a sufficient enough form of acid for baking cookies. Nonetheless, people will devour these and may be clamoring for more, so it's a good thing the initial recipe makes 4 dozen!

French Macarons, also from Martha: Exceptionally fussy if you don't have a good flour sifter (which I don't), and are forced to use a sieve, (which I am!), but well worth the effort in the end. There is definitely a macaron craze going on in this dessert-lovin' nation of ours right now, right down to entire bakeshops opening up simply to sell macarons. I was out of practice when I tackled these this week, but they came out totally perfect using Martha's recipe. The variations this recipe includes are also nice, especially the pistachio. Make sure you purchase ready-made almond flour though, and if you decide to grind your own, don't use blanched silvered almonds. Something about their initial structure does not make a true finely ground flour. Somewhere on Martha's site, I read that if you grind your own, you should use blanched sliced almonds. Considering I have a caveperson's sifter (don't ask; totally useless gadget in my kitchen, start to finish) and otherwise have to use a small sieve, I really couldn't fathom adding that extra step for myself, so I purchased almond flour from Whole Foods (Bob's Red Mill brand) for $12.99/lb, which is rather steep. I later found it at Nuts Online in much cheaper 1-lb and 5-lb packages. A little goes a long way though, as you can get about 2 dozen macarons out of less than a cup of almond flour. All that said though, what is really at stake with making macarons is your technique. Follow this recipe carefully, and you'll do just fine. I Love Macarons, a cute little primer on this ever-precious treat, also details what can go wrong and why, lots and lots of flavor combinations, and some great recipes for fillings.

The Essential Chewy Sugar Cookie from my good friend HD: You'll want to eat five in one sitting, I'm sure of it! These are so perfect, so chewy, so buttery, not too sugary, and just an all-around easy-peasy recipe to make, there's no reason to not do this one this year! You'll note in the recipe that it does not use the standard creaming method for making cookies but asks for more of a dump-it-all-in-and-finish-with-flour format. It works though, so give it a whirl. My fifth-graders even made them at the youth center where I teach, and everyone in the kitchen was clamoring for a few. Bake some tonight--it's the perfect lunchbox treat for this last week before the holiday rush!

Essential Chewy Sugar Cookie


3/4 cup (12 tablespoons) unsalted butter
3/4 cup granulated sugar
1/2 cup light brown sugar
1/4 cup light corn syrup
2 teaspoons vanilla extract
1/4 teaspoon nutmeg or lemon oil (optional)
1 1/2 teaspoon baking powder 
1/2 teaspoon baking soda
1/2 teaspoon salt
1 large egg
2 1/2 cups unbleached all-purpose flour
1/4 cup coarse or granulated sanding sugar for coating

Preheat oven to 375°F degrees. Line baking sheets with Silpat or parchment paper.

In a large mixing bowl, beat together the butter, granulated and brown sugars, corn syrup, vanilla, nutmeg, baking powder, baking soda, salt, and egg. Stir in the flour.

Place the course sugar in a shallow dish. Drop the dough by tablespoonful into the sugar, rolling the balls to coat them. Place on prepared baking sheets and bake for 10 minutes, or until the edges are just barely beginning to brown (Note: They will look soft; if you bake these cookies too long, they’ll be crunchy and not chewy.)

Remove them from the oven and cool on the baking sheet for 5 minutes, then transfer them to a rack to cool completely. Makes 3 dozen.

November 24, 2010

The Blind Side of Baking

I realize this post is perhaps coming a bit late for your Thanksgiving baking, but in case you are planning for more pies this season, I wanted to comment on some recent experiences with blind baking, or what most people know as the prebaked pie shell.

Generally, the drama that ensues with prebaking a homemade crust is the slippage factor. It's very hard to keep a real all-butter or mostly butter pie crust from slipping into a big buttery pile at the bottom of your pie pan. For some reason, the machine-made, store-bought, full-of-palm-or-various-tropical-oils refrigerated or frozen pie crusts don't do that, and I'm not sure why. I'd imagine it has something to do with the amount of preservatives and other fake ingredients that hold it in place. Makes me wonder whether you really should be ingesting something that will most likely still be there in 2030.

Well, never fear; Flaky Pastry's here to help clear the path to homebaked pies. First, you need a trusty, all-purpose pie dough recipe. Dorie Greenspan's Good for Almost Everything Pie Crust recipe is a foolproof keeper around our house. I use it for everything, including chicken pot pie (and other savory pies), hand pies and turnovers, fruit pies, cream pies, nut pies, you name it. The sugar in it is negligible and mostly helps with the browning factor, so using it for savory baking is just fine. Some butter purists would balk at its use of shortening, but it actually aids in the flakiness factor. I highly recommend making her recipe as-is. Don't change a thing! You'll be thrilled with the finished product.

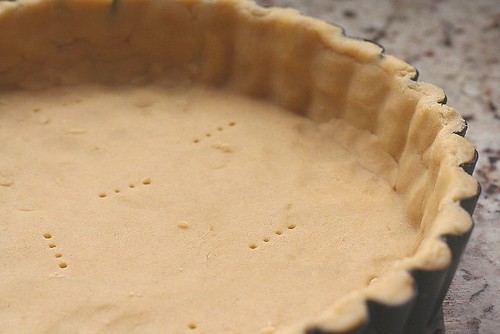
Once you've rolled out and placed your crust in your pie plate, and completed your decorative edge (whether it's the simple poke-and-pinch method I like to use or small cookie-cutter-cut shapes placed around the edges and egg-washed), you'll want to prick it with a fork all over the bottom and along the sides. Freeze your pie shell for 15-20 minutes. Next, place a sheet of parchment paper or foil in the center, pressing to make it flush against the crust. Fill the entire cavity with dried beans or ceramic pie weights. We're talking fill it to the brim, folks! I even try to tuck the parchment against the fluted edges and get beans into the corners so that my fluted edges are maintained. The key to prebaking a shell with no slippage is to weight it down properly and completely.

 Return your beans-and-shell to the freezer for 10 minutes while you preheat your oven to 425℉. Bake shell for 15 minutes and reduce the oven temperature to 375℉. Remove the pie weights/beans and parchment, brush the inside, sides, and edges with egg wash (1 egg yolk and 2 tablespoons milk, half-n-half, or cream), and return it to your 375℉ oven. Bake another 20 minutes and let cool on wire rack before filling.

You can dry out your beans on a sheet pan overnight for future use. I store mine in Ziploc bags in the pantry. Unfortunately, I have only recently switched to using beans, so I can't speak to how many times you can use them, but I suppose the beans will start opening and exposing themselves (!!!) after multiple uses, so definitely throw them out when they reach that point.

So hopefully, in the end, you'll get something that looks like this. This holiday weekend's orders included Chocolate Silk, Sweet Potato, and Banana Cream, all of which used this method for blind baking. So now, I'm going to shut my piehole and let you take it away! Happy Thanksgiving, everyone!

November 19, 2010

Eat This, Rachel Ray


If I were to pen a modern-day Dante's Inferno, I'd reserve one circle of hell for Rachel Ray. I detest her faux-cheeriness and false charm. She may sauté chicken in e.v.o.o., but it will always be olive oil to me. While Julia Child elevated her audience, Ray cooks like everyone else. And a top-rate meal in 30 minutes? Puh-leeze. That's not possible without quality-reducing shortcuts, subpar, premade ingredients, and often in Ray's case, unwashed fruits and vegetables. Speed and quality go together a lot like fat-free and ice cream: It's possible, but a lot gets lost in the process.

Italians might disagree. Yes, Italy is home to the Slow Food movement, which aims to be everything fast food is not. Many of its culinary treasures, such as the long-simmered Bolognese ragu, aren't exactly ideal for busy Tuesday nights. And other than on the road—riding in a car with an Italian driver is often a white-knuckle experience—many Italians don't appear in a hurry to do much of anything. Yet most Italian dishes don't require complicated techniques and take little time to execute. The idea is to use few ingredients and maximize each of their flavors.

There's no better embodiment of this principle than Marcella Hazan's tomato sauce with onions and butter, whose name tells you all the ingredients you'll need. (Hazan, by the way, did for Italian food what Julia Child did for French in her masterful Essentials of Classic Italian Cooking.)

Here's what you need: A 15-ounce can of plum Italian tomatoes, 5 tablespoons of butter, and a medium onion, peeled and cut in half. Oh, and of course, salt. In a saucepan, combine all the ingredients, bring them to a slow, steady simmer for about 30 minutes (or maybe 45, if you listen to Marcella). Occasionally stir, breaking the tomatoes with the back of a wooden spoon, which gives the sauce a smooth texture. Once it's thickened, test for salt, and that's about it. There's no need for further embellishment, though I've found a healthy dash or two of heavy cream will do it no harm.

With so few ingredients, there's nowhere for bad tomatoes to hide. I know of no sauce that so simply showcases tomatoes' irresistible sweetness, but it won't do so if you use under-ripened, highly acidic ones that sadly dominate most supermarket shelves. My favorites are the Italian plum tomatoes from Carmelina, which you can find at Whole Foods. A less-expensive, more-accessible alternative brand is Muir Glen, which packages organic California tomatoes.

This sauce pairs best with stuffed pastas or those with some added personality, such as gnocchi. I prefer to serve it as it is in homes and trattorias in Bologna, Italy, coating meat-stuffed tortellini.

As much as it pains me to admit it, Rachel Ray is right. Sorta. Great food made without a lot of effort is possible in only 30 minutes. But the Italians teach you don't need to stoop to her level to next time you're in a pinch.

Buon Appetito!

October 30, 2010

Burger King Deliberates the More Mindful Burger

On a sunny and seasonably cool October Sunday afternoon, with lunch time upon us, the Burger King and one of his burger minions journeyed to a fairly recent addition to Chicago’s burger scene: Epic Burger.

A number of burger houses have popped up all over Chicago in the past few years. Based in a relatively bustling strip of Lincoln Park near North Avenue, Epic, not unlike rivals such as Five Guys or The Counter, isn’t necessarily an upscale dining establishment, but it is leaps and bounds above traditional fast food eateries. Touted as a “more mindful” burger, Epic offers patrons an assortment of refined options to assist in building their desired burger, including cage-free organic eggs and whole-wheat buns. Choice alternatives are available for those looking to avoid red meat, such as all-natural chicken breast or portabella mushroom sandwiches. Still, the burger reigns supreme at Epic, and burgers are this king’s business.

The hungry handful in line ahead of his Majesty dissipated swiftly upon our arrival, making the wait time quick and painless. For the King, the choice was simple: The all-natural Epic burger (a double) with house sauce, lettuce, tomatoes, raw onions, pickles, and Wisconsin cheddar on a whole-wheat bun. Unfortunately, Epic lost some points on serve time, with the order finally arriving after what seemed like well, an epic wait!

The first ostensible item of significance was the pool of grease spreading throughout the brown paper bag in which the burger dwelled--not a good initial sign. After peeling back the sopping wet bag, the real work was upon us. Epic burgers don’t resemble traditional burgers. The meat typically isn’t round, and tends to be somewhat flat, making it appear more like a flank steak than a hamburger. With the first bite, a number of mainly positive sensations ran over the palette. The lettuce, tomatoes, onions, and pickles were all crisp and fresh, with some melty, flavorful cheddar sitting right on top. Even so, those few pleasantries couldn’t mask the two main detractors of the experience: the unoriginal Epic sauce covering the greasy main event.

For starters, this “Epic sauce” differs little from the Thousand Island dressing on McDonald’s Big Mac. Considering that Epic’s prices aren’t exactly competitive with Mickey D's, this was a notable disappointment. Even more unacceptable was the excessive spattering of grease lurking within. This ground beef had been violated, so much so that it could barely keep itself together, crumbling apart after each bite. As the halfway point approached, few features of the burger were able to triumph over the extreme grease seeping from the meat. The bitter (or, more appropriately, oily) end was not far off. The remaining half was abandoned, transported to the nearest receptacle for prompt termination.

Despite the favorable reviews from legions of faithful Chicago locals, this is not a burger worth exploring. Costs are steep for the experience, and the experience is unsatisfactory, clocking in at nearly $10 for a double cheeseburger by its lonesome. In this type of burger class, whereby diners aren’t looking for burgers on either end of the price spectrum, Five Guys remains the ruling champion.

September 22, 2010

The Flame Still Burns Bright at Naha (for the most part!)

In New York, what's hot remains that way for approximately as long as Britney Spears stays married. Chicago's relationship with its hot spots, though, is decidedly more long term. Sure, the must-try new restaurants of the early 2000s—MK, Blackbird, and Naha—may not inspire the sort of excitement they did when their doors first opened, but they still enjoy a loyal following.

I wouldn't laud such loyalty if it weren't well-deserved. There's nothing worse than clinging to a relationship long after the magic has died. Yet Naha remains both filling and fulfilling after all these years. That's at least partly because it's managed to stay fresh inside the kitchen and out.

On the latter score, Naha's clean-lined, vaguely Zen-like, formal-without-really-feeling-like-it space is still modern, but warmly so. More importantly, chef (and Chicago native) Carrie Nahabedian's seasonal, mostly Mediterranean-inspired cuisine largely struck the right notes, though at times I thought there could be fewer of them.

Take the scallop appetizer, for instance. I could barely detect the promised vanilla bean flavor, maybe because it couldn't compete with the accompanying endive, hearts of palm, musk and watermelons. That said, the scallops were thick, lightly sweet, and perfectly cooked. And had the vanilla flavor been more pronounced, it might have become cloying, an outcome that would've been much worse.

Where the complexity worked especially well was in my main course dish. The squab, a Naha specialty, showcased Nahabedian's affinity for Middle Eastern flavors. Served along with raisins, dates, and a noodle cake--a sort of noodle patty crisped on the outside--the squab came cooked a rosy medium rare along with a melt-in-my-mouth piece of foie gras (I'm hesitant to say that it was so good it shouldn't be legal, but I don't want to give any Chicago pols any ideas. Banning it once was enough.) My favorite element of the entire dish was the rose, licorice, gooseberry, and anise sauce coating the plate. I'm not sure anyone could distinguish between its many different components--what is gooseberry anyway?--but that just may be the point: The sum of the flavors are much greater than the parts.

My boyfriend tried the Arctic char. I won't say too much about it since I got just a bite, but I can't blame him for keeping the lion's share to himself. Ordinarily I'm not a big fan of char, which usually makes me think I'm eating salmon's bastard child. Yet at Naha, it was flaky, moist, and had a flavor profile of its own.

Dessert, however, was a big disappointment. I anticipated the pain perdu, or French toast, would arrive moist and eggy but it was little more than a browned piece of brioche. And sadly, the strawberry topping was little better than one might get at the IHOP. At $14, that may have been the most expensive piece of toast I've ever had. (Our experience may be an anomaly, though. Flaky Pastry has fared much better, and she's a far higher authority on dessert than me).

Naha surely isn't for penny pinchers. The average entrée hovers near $40, and dessert is $14 no matter what you order. (Prices for the appetizers are similarly steep. A simple sounding beet salad clocked in at $17.) I may have found those price tags are easier to stomach thanks to Naha's well-crafted cocktails. Those cost me too, but even in the best of relationships, you sometimes need a stiff drink.