I realize this post is perhaps coming a bit late for your Thanksgiving baking, but in case you are planning for more pies this season, I wanted to comment on some recent experiences with blind baking, or what most people know as the prebaked pie shell.
Generally, the drama that ensues with prebaking a homemade crust is the slippage factor. It's very hard to keep a real all-butter or mostly butter pie crust from slipping into a big buttery pile at the bottom of your pie pan. For some reason, the machine-made, store-bought, full-of-palm-or-various-tropical-oils refrigerated or frozen pie crusts don't do that, and I'm not sure why. I'd imagine it has something to do with the amount of preservatives and other fake ingredients that hold it in place. Makes me wonder whether you really should be ingesting something that will most likely still be there in 2030.
Well, never fear; Flaky Pastry's here to help clear the path to homebaked pies. First, you need a trusty, all-purpose pie dough recipe.
Dorie Greenspan's Good for Almost Everything Pie Crust recipe is a foolproof keeper around our house. I use it for everything, including chicken pot pie (and other savory pies), hand pies and turnovers, fruit pies, cream pies, nut pies, you name it. The sugar in it is negligible and mostly helps with the browning factor, so using it for savory baking is just fine. Some butter purists would balk at its use of shortening, but it actually aids in the flakiness factor. I highly recommend making her recipe as-is. Don't change a thing! You'll be thrilled with the finished product.
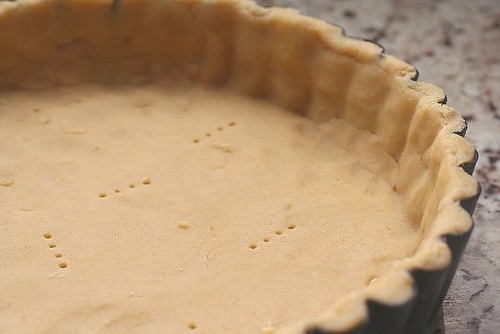
Once you've rolled out and placed your crust in your pie plate, and completed your decorative edge (whether it's the simple poke-and-pinch method I like to use or small cookie-cutter-cut shapes placed around the edges and egg-washed), you'll want to prick it with a fork all over the bottom and along the sides. Freeze your pie shell for 15-20 minutes. Next, place a sheet of parchment paper or foil in the center, pressing to make it flush against the crust. Fill the entire cavity with dried beans or ceramic pie weights. We're talking fill it to the brim, folks! I even try to tuck the parchment against the fluted edges and get beans into the corners so that my fluted edges are maintained. The key to prebaking a shell with no slippage is to weight it down properly and completely.

Return your beans-and-shell to the freezer for 10 minutes while you preheat your oven to 425℉. Bake shell for 15 minutes and reduce the oven temperature to 375℉. Remove the pie weights/beans and parchment, brush the inside, sides, and edges with egg wash (1 egg yolk and 2 tablespoons milk, half-n-half, or cream), and return it to your 375℉ oven. Bake another 20 minutes and let cool on wire rack before filling.
You can dry out your beans on a sheet pan overnight for future use. I store mine in Ziploc bags in the pantry. Unfortunately, I have only recently switched to using beans, so I can't speak to how many times you can use them, but I suppose the beans will start opening and exposing themselves (!!!) after multiple uses, so definitely throw them out when they reach that point.
So hopefully, in the end, you'll get something that looks like this. This holiday weekend's orders included Chocolate Silk, Sweet Potato, and Banana Cream, all of which used this method for blind baking. So now, I'm going to shut my piehole and let you take it away! Happy Thanksgiving, everyone!


No comments:
Post a Comment