December 19, 2010

Cookie Swap!

It's that time of year... Cookie Monsters everywhere are baking up a storm, filling pretty tins with delectables, and delivering them near and far. This year, I tested a few new recipes and found some real winners, including getting my French macaron game on again. I hadn't tackled that fussy little task since pastry school and was worried I'd forgotten the how-to, but it all came back to me, and now I'm having a hey-day with them. A macaron obsession, if you will, thinking about all the unending possibilities of flavor combinations! Here are some solid staples you might want to try in these last days of baking before Christmas...

Fine Cooking's Orange Butter Cookies with Grand Marnier Glaze: Soft, buttery orangey cookie with a tasty even-orangey-er glaze! You can substitute Triple Sec for Grand Mariner to cut costs. The flavor effect is about the same. The butter cookie recipe is also a great basic roll-out recipe for any other flavoring, including lemon or lime. The use of yolks instead of the whole egg give the dough a nice, pliable feel and a golden color.

Chocolate Caramel Bars from Martha Stewart: If you're not planning to transport them elsewhere for presentation, follow the recipe and make them in bar format. Use a hot, wet knife to make clean cuts, and definitely make sure you leave extra parchment hanging over the pan's edges in order to pull it out of the pan and lay it flat on your cutting board. However, if you do want a neater, cleaner presentation, this filling works great in small tart shells or between two butter cookies. You could use the Fine Cooking recipe above, but leave out all the orange flavoring (or keep it, if you go for that chocolate-orange zest appeal!).  One note of caution though... Martha's editors fail to tell you how to caramelize sugar for real. The extra water in this recipe wreaks significant havoc on the caramelizing process, I must say. This online tutorial on caramelizing sugar without water is excellent and will give you the confidence to make caramel any ol' time!

Nielsen-Massey's Chocolate Chip Cookies: This recipe is absolute perfection time and time again. It doesn't matter the mixer, the oven, the altitude, the humidity, whatever... They are perfectly soft and chewy in the center and crispy around the outside. I actually leave out the cream of tartar. This description gives you the reasons for cream of tartar in recipes, but quite honestly, I don't know the purpose of it in this one, as it already contains baking powder, which is a sufficient enough form of acid for baking cookies. Nonetheless, people will devour these and may be clamoring for more, so it's a good thing the initial recipe makes 4 dozen!

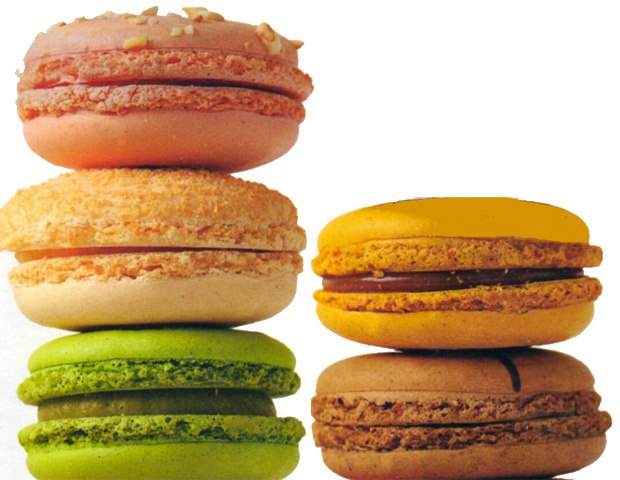
French Macarons, also from Martha: Exceptionally fussy if you don't have a good flour sifter (which I don't), and are forced to use a sieve, (which I am!), but well worth the effort in the end. There is definitely a macaron craze going on in this dessert-lovin' nation of ours right now, right down to entire bakeshops opening up simply to sell macarons. I was out of practice when I tackled these this week, but they came out totally perfect using Martha's recipe. The variations this recipe includes are also nice, especially the pistachio. Make sure you purchase ready-made almond flour though, and if you decide to grind your own, don't use blanched silvered almonds. Something about their initial structure does not make a true finely ground flour. Somewhere on Martha's site, I read that if you grind your own, you should use blanched sliced almonds. Considering I have a caveperson's sifter (don't ask; totally useless gadget in my kitchen, start to finish) and otherwise have to use a small sieve, I really couldn't fathom adding that extra step for myself, so I purchased almond flour from Whole Foods (Bob's Red Mill brand) for $12.99/lb, which is rather steep. I later found it at Nuts Online in much cheaper 1-lb and 5-lb packages. A little goes a long way though, as you can get about 2 dozen macarons out of less than a cup of almond flour. All that said though, what is really at stake with making macarons is your technique. Follow this recipe carefully, and you'll do just fine. I Love Macarons, a cute little primer on this ever-precious treat, also details what can go wrong and why, lots and lots of flavor combinations, and some great recipes for fillings.

The Essential Chewy Sugar Cookie from my good friend HD: You'll want to eat five in one sitting, I'm sure of it! These are so perfect, so chewy, so buttery, not too sugary, and just an all-around easy-peasy recipe to make, there's no reason to not do this one this year! You'll note in the recipe that it does not use the standard creaming method for making cookies but asks for more of a dump-it-all-in-and-finish-with-flour format. It works though, so give it a whirl. My fifth-graders even made them at the youth center where I teach, and everyone in the kitchen was clamoring for a few. Bake some tonight--it's the perfect lunchbox treat for this last week before the holiday rush!

Essential Chewy Sugar Cookie


3/4 cup (12 tablespoons) unsalted butter
3/4 cup granulated sugar
1/2 cup light brown sugar
1/4 cup light corn syrup
2 teaspoons vanilla extract
1/4 teaspoon nutmeg or lemon oil (optional)
1 1/2 teaspoon baking powder 
1/2 teaspoon baking soda
1/2 teaspoon salt
1 large egg
2 1/2 cups unbleached all-purpose flour
1/4 cup coarse or granulated sanding sugar for coating

Preheat oven to 375°F degrees. Line baking sheets with Silpat or parchment paper.

In a large mixing bowl, beat together the butter, granulated and brown sugars, corn syrup, vanilla, nutmeg, baking powder, baking soda, salt, and egg. Stir in the flour.

Place the course sugar in a shallow dish. Drop the dough by tablespoonful into the sugar, rolling the balls to coat them. Place on prepared baking sheets and bake for 10 minutes, or until the edges are just barely beginning to brown (Note: They will look soft; if you bake these cookies too long, they’ll be crunchy and not chewy.)

Remove them from the oven and cool on the baking sheet for 5 minutes, then transfer them to a rack to cool completely. Makes 3 dozen.

November 24, 2010

The Blind Side of Baking

I realize this post is perhaps coming a bit late for your Thanksgiving baking, but in case you are planning for more pies this season, I wanted to comment on some recent experiences with blind baking, or what most people know as the prebaked pie shell.

Generally, the drama that ensues with prebaking a homemade crust is the slippage factor. It's very hard to keep a real all-butter or mostly butter pie crust from slipping into a big buttery pile at the bottom of your pie pan. For some reason, the machine-made, store-bought, full-of-palm-or-various-tropical-oils refrigerated or frozen pie crusts don't do that, and I'm not sure why. I'd imagine it has something to do with the amount of preservatives and other fake ingredients that hold it in place. Makes me wonder whether you really should be ingesting something that will most likely still be there in 2030.

Well, never fear; Flaky Pastry's here to help clear the path to homebaked pies. First, you need a trusty, all-purpose pie dough recipe. Dorie Greenspan's Good for Almost Everything Pie Crust recipe is a foolproof keeper around our house. I use it for everything, including chicken pot pie (and other savory pies), hand pies and turnovers, fruit pies, cream pies, nut pies, you name it. The sugar in it is negligible and mostly helps with the browning factor, so using it for savory baking is just fine. Some butter purists would balk at its use of shortening, but it actually aids in the flakiness factor. I highly recommend making her recipe as-is. Don't change a thing! You'll be thrilled with the finished product.

Once you've rolled out and placed your crust in your pie plate, and completed your decorative edge (whether it's the simple poke-and-pinch method I like to use or small cookie-cutter-cut shapes placed around the edges and egg-washed), you'll want to prick it with a fork all over the bottom and along the sides. Freeze your pie shell for 15-20 minutes. Next, place a sheet of parchment paper or foil in the center, pressing to make it flush against the crust. Fill the entire cavity with dried beans or ceramic pie weights. We're talking fill it to the brim, folks! I even try to tuck the parchment against the fluted edges and get beans into the corners so that my fluted edges are maintained. The key to prebaking a shell with no slippage is to weight it down properly and completely.

 Return your beans-and-shell to the freezer for 10 minutes while you preheat your oven to 425℉. Bake shell for 15 minutes and reduce the oven temperature to 375℉. Remove the pie weights/beans and parchment, brush the inside, sides, and edges with egg wash (1 egg yolk and 2 tablespoons milk, half-n-half, or cream), and return it to your 375℉ oven. Bake another 20 minutes and let cool on wire rack before filling.

You can dry out your beans on a sheet pan overnight for future use. I store mine in Ziploc bags in the pantry. Unfortunately, I have only recently switched to using beans, so I can't speak to how many times you can use them, but I suppose the beans will start opening and exposing themselves (!!!) after multiple uses, so definitely throw them out when they reach that point.

So hopefully, in the end, you'll get something that looks like this. This holiday weekend's orders included Chocolate Silk, Sweet Potato, and Banana Cream, all of which used this method for blind baking. So now, I'm going to shut my piehole and let you take it away! Happy Thanksgiving, everyone!

November 19, 2010

Eat This, Rachel Ray


If I were to pen a modern-day Dante's Inferno, I'd reserve one circle of hell for Rachel Ray. I detest her faux-cheeriness and false charm. She may sauté chicken in e.v.o.o., but it will always be olive oil to me. While Julia Child elevated her audience, Ray cooks like everyone else. And a top-rate meal in 30 minutes? Puh-leeze. That's not possible without quality-reducing shortcuts, subpar, premade ingredients, and often in Ray's case, unwashed fruits and vegetables. Speed and quality go together a lot like fat-free and ice cream: It's possible, but a lot gets lost in the process.

Italians might disagree. Yes, Italy is home to the Slow Food movement, which aims to be everything fast food is not. Many of its culinary treasures, such as the long-simmered Bolognese ragu, aren't exactly ideal for busy Tuesday nights. And other than on the road—riding in a car with an Italian driver is often a white-knuckle experience—many Italians don't appear in a hurry to do much of anything. Yet most Italian dishes don't require complicated techniques and take little time to execute. The idea is to use few ingredients and maximize each of their flavors.

There's no better embodiment of this principle than Marcella Hazan's tomato sauce with onions and butter, whose name tells you all the ingredients you'll need. (Hazan, by the way, did for Italian food what Julia Child did for French in her masterful Essentials of Classic Italian Cooking.)

Here's what you need: A 15-ounce can of plum Italian tomatoes, 5 tablespoons of butter, and a medium onion, peeled and cut in half. Oh, and of course, salt. In a saucepan, combine all the ingredients, bring them to a slow, steady simmer for about 30 minutes (or maybe 45, if you listen to Marcella). Occasionally stir, breaking the tomatoes with the back of a wooden spoon, which gives the sauce a smooth texture. Once it's thickened, test for salt, and that's about it. There's no need for further embellishment, though I've found a healthy dash or two of heavy cream will do it no harm.

With so few ingredients, there's nowhere for bad tomatoes to hide. I know of no sauce that so simply showcases tomatoes' irresistible sweetness, but it won't do so if you use under-ripened, highly acidic ones that sadly dominate most supermarket shelves. My favorites are the Italian plum tomatoes from Carmelina, which you can find at Whole Foods. A less-expensive, more-accessible alternative brand is Muir Glen, which packages organic California tomatoes.

This sauce pairs best with stuffed pastas or those with some added personality, such as gnocchi. I prefer to serve it as it is in homes and trattorias in Bologna, Italy, coating meat-stuffed tortellini.

As much as it pains me to admit it, Rachel Ray is right. Sorta. Great food made without a lot of effort is possible in only 30 minutes. But the Italians teach you don't need to stoop to her level to next time you're in a pinch.

Buon Appetito!

October 30, 2010

Burger King Deliberates the More Mindful Burger

On a sunny and seasonably cool October Sunday afternoon, with lunch time upon us, the Burger King and one of his burger minions journeyed to a fairly recent addition to Chicago’s burger scene: Epic Burger.

A number of burger houses have popped up all over Chicago in the past few years. Based in a relatively bustling strip of Lincoln Park near North Avenue, Epic, not unlike rivals such as Five Guys or The Counter, isn’t necessarily an upscale dining establishment, but it is leaps and bounds above traditional fast food eateries. Touted as a “more mindful” burger, Epic offers patrons an assortment of refined options to assist in building their desired burger, including cage-free organic eggs and whole-wheat buns. Choice alternatives are available for those looking to avoid red meat, such as all-natural chicken breast or portabella mushroom sandwiches. Still, the burger reigns supreme at Epic, and burgers are this king’s business.

The hungry handful in line ahead of his Majesty dissipated swiftly upon our arrival, making the wait time quick and painless. For the King, the choice was simple: The all-natural Epic burger (a double) with house sauce, lettuce, tomatoes, raw onions, pickles, and Wisconsin cheddar on a whole-wheat bun. Unfortunately, Epic lost some points on serve time, with the order finally arriving after what seemed like well, an epic wait!

The first ostensible item of significance was the pool of grease spreading throughout the brown paper bag in which the burger dwelled--not a good initial sign. After peeling back the sopping wet bag, the real work was upon us. Epic burgers don’t resemble traditional burgers. The meat typically isn’t round, and tends to be somewhat flat, making it appear more like a flank steak than a hamburger. With the first bite, a number of mainly positive sensations ran over the palette. The lettuce, tomatoes, onions, and pickles were all crisp and fresh, with some melty, flavorful cheddar sitting right on top. Even so, those few pleasantries couldn’t mask the two main detractors of the experience: the unoriginal Epic sauce covering the greasy main event.

For starters, this “Epic sauce” differs little from the Thousand Island dressing on McDonald’s Big Mac. Considering that Epic’s prices aren’t exactly competitive with Mickey D's, this was a notable disappointment. Even more unacceptable was the excessive spattering of grease lurking within. This ground beef had been violated, so much so that it could barely keep itself together, crumbling apart after each bite. As the halfway point approached, few features of the burger were able to triumph over the extreme grease seeping from the meat. The bitter (or, more appropriately, oily) end was not far off. The remaining half was abandoned, transported to the nearest receptacle for prompt termination.

Despite the favorable reviews from legions of faithful Chicago locals, this is not a burger worth exploring. Costs are steep for the experience, and the experience is unsatisfactory, clocking in at nearly $10 for a double cheeseburger by its lonesome. In this type of burger class, whereby diners aren’t looking for burgers on either end of the price spectrum, Five Guys remains the ruling champion.

September 22, 2010

The Flame Still Burns Bright at Naha (for the most part!)

In New York, what's hot remains that way for approximately as long as Britney Spears stays married. Chicago's relationship with its hot spots, though, is decidedly more long term. Sure, the must-try new restaurants of the early 2000s—MK, Blackbird, and Naha—may not inspire the sort of excitement they did when their doors first opened, but they still enjoy a loyal following.

I wouldn't laud such loyalty if it weren't well-deserved. There's nothing worse than clinging to a relationship long after the magic has died. Yet Naha remains both filling and fulfilling after all these years. That's at least partly because it's managed to stay fresh inside the kitchen and out.

On the latter score, Naha's clean-lined, vaguely Zen-like, formal-without-really-feeling-like-it space is still modern, but warmly so. More importantly, chef (and Chicago native) Carrie Nahabedian's seasonal, mostly Mediterranean-inspired cuisine largely struck the right notes, though at times I thought there could be fewer of them.

Take the scallop appetizer, for instance. I could barely detect the promised vanilla bean flavor, maybe because it couldn't compete with the accompanying endive, hearts of palm, musk and watermelons. That said, the scallops were thick, lightly sweet, and perfectly cooked. And had the vanilla flavor been more pronounced, it might have become cloying, an outcome that would've been much worse.

Where the complexity worked especially well was in my main course dish. The squab, a Naha specialty, showcased Nahabedian's affinity for Middle Eastern flavors. Served along with raisins, dates, and a noodle cake--a sort of noodle patty crisped on the outside--the squab came cooked a rosy medium rare along with a melt-in-my-mouth piece of foie gras (I'm hesitant to say that it was so good it shouldn't be legal, but I don't want to give any Chicago pols any ideas. Banning it once was enough.) My favorite element of the entire dish was the rose, licorice, gooseberry, and anise sauce coating the plate. I'm not sure anyone could distinguish between its many different components--what is gooseberry anyway?--but that just may be the point: The sum of the flavors are much greater than the parts.

My boyfriend tried the Arctic char. I won't say too much about it since I got just a bite, but I can't blame him for keeping the lion's share to himself. Ordinarily I'm not a big fan of char, which usually makes me think I'm eating salmon's bastard child. Yet at Naha, it was flaky, moist, and had a flavor profile of its own.

Dessert, however, was a big disappointment. I anticipated the pain perdu, or French toast, would arrive moist and eggy but it was little more than a browned piece of brioche. And sadly, the strawberry topping was little better than one might get at the IHOP. At $14, that may have been the most expensive piece of toast I've ever had. (Our experience may be an anomaly, though. Flaky Pastry has fared much better, and she's a far higher authority on dessert than me).

Naha surely isn't for penny pinchers. The average entrée hovers near $40, and dessert is $14 no matter what you order. (Prices for the appetizers are similarly steep. A simple sounding beet salad clocked in at $17.) I may have found those price tags are easier to stomach thanks to Naha's well-crafted cocktails. Those cost me too, but even in the best of relationships, you sometimes need a stiff drink.

September 6, 2010

When Push Comes to Chevre...

Goat cheese is a quintessential summer ingredient. It's soft, spreadable, crumbly, tangy, and creamy all at once. A great biography on goat cheese can be found here, but generally, it's known to be lower in fat and higher in vitamin A and potassium than cow's milk. Also, people who have a lactose intolerance for cow's milk find goat milk products easier to digest.

Our household is unfortunately undergoing a bit of a tolerance regime change in our older age, but we're also nuts for cheesecake and pizza around here. So this summer, we tried our hand at pizza with goat cheese (superb!) and this weekend--a goat cheese cheesecake! It still had plenty of other cow's milk products in it (mascarpone and cream cheese), but because those ingredients were cut down to make way for the flavor boom that is goat cheese, our bellies and our palates were quite satisfied. I served it buffet-style with three sauces: seedless raspberry port wine sauce (8 ounces of seedless raspberry jam simmered in about a cup of sweet port wine), my hot fudge sauce, and a beautiful, silky butterscotch sauce. (I'll include that another day, otherwise this blog entry will be too long to bother with!)

The key is to make sure all your cheeses are room temperature, otherwise you'll suffer with lumps. I did not add sugar to the crust either. I felt with the amount going into the filling plus the sauces, it was not necessary. If you like a sweeter crust, start with 1/4 cup granulated sugar and try it once that way. If you think it needs more, go up to a half cup next time. Also, the original recipe called for a vanilla bean split and scraped, but I save my vanilla beans for things that need steeping in cream or milk, like ice cream and chocolate truffles. I prefer using vanilla bean paste when it's part of the presentation that we actually see the vanilla flecks. It's cheaper than whole vanilla beans and more concentrated than extract, so it provides the overall effect I'm looking for without too much expense. Last but not least, I used a water bath with this one, which I generally don't because most of my cheesecakes have some sort of topping that masks the cracked top that occurs when baking cheesecakes. Doing a water bath is not hard and is well worth it for a party-worthy presentation!

As we hang onto these last days of summer, I'd highly recommend putting your springform to work on a new kid in town. Your tastebuds will thank you!

Goat Cheese Cheesecake (adapted from The Last Course, by Claudia Fleming)

2 cups graham cracker crumbs
1/4 to 1/2 cup granulated sugar (optional)
1/2 cup (1 stick) unsalted butter, melted

12 ounces cream cheese, room temperature (1 1/2 bricks)
8 ounces fresh goat cheese (1 large log or two small ones), room temperature
1 cup sugar
1 tablespoon vanilla bean paste
1 1/2 cups (12 ounces) mascarpone cheese, room temperature
4 large eggs, room temperature

Preheat oven to 350℉. In a large bowl, combine graham cracker crumbs and sugar (if using), and mix well. Add melted butter and stir until combined. Press evenly into bottom and sides of 9-inch springform pan. You will use all your mixture. Bake for 8 minutes until set. Remove from oven to allow to cool and reduce oven temperature to 325℉.

In a separate large bowl, combine cream cheese, goat chese, sugar, and vanilla paste and beat with an electric mixer until smooth and creamy, about 3 minutes. Add the mascarpone and beat until smooth (another 1-2 minutes). Add the eggs individually, scraping down sides and bottom of bowl after each addition. Scrape bottom and sides of bowl one last time and mix well for 30 seconds.

Tightly wrap outside of prepared pan with aluminum foil, making sure there are no gaps. Pour mixture into pan and place in center of a larger baking pan with at least 2-inch sides. Pour enough hot water into the larger pan (not your cheesecake!) to reach two-thirds up the side of the springform pan. Cover the entire baking pan with foil and pierce in several places to allow for steam release. Bake 1 hour, then lift off a corner or two of the foil for additional steam release, and bake 50 minutes longer, or until cheesecake looks set around the edges but is ever-so-slightly jiggly in the center.

Transfer cheesecake to a wire rack to cool completely, then chill in refrigerator at least 3 hours before serving. Cheesecake can be made up to two days ahead and will keep, refrigerated, for about a week. Serves 12-16 pretty darn generously! Serve with sauces or seasonal fruit.

August 30, 2010

The Sugar Art of Learning

Many apologies for my lack of presence here. It's been one crazy summer (wedding season for a pastry chef always is), but I did manage to cram in a little continuing education for myself last week in Atlanta at the famed International Sugar Art Collection. I've taken classes with Chef Nicholas Lodge here in Chicago at my alma mater, The French Pastry School, and I have longed for an opportunity to go to his school down south and learn from the master of sugar artistry. You've probably seen him on Food Network, where he often serves as a judge for Wedding Cake Challenges and other cake-oriented insanity cable television is notorious for. But a day or two (or four, in my case!) in his classroom is like Cake Artistry 101, 201, 301, and 401 all at once! I learned more about recent fondant and gumpaste trends than I ever would struggling at home with books from Amazon. Well worth the trip and tuition!

Here are some of the all-stars from my four days there. See the captions in the Flickr roll for a description of the type of sugar artistry used in each example. I am excited about being able to offer these elements for cake orders going forward. Care to place an order??

July 31, 2010

Have a Ball!

Cake balls/pops/truffles/etc. seem to be all the rage these days. People have been asking me for some time what the next big thing after cupcakes will be, and I think this may be it. Bakeries all over the country have started offering them because they help make use of "cake droppings," as I like to call them. These are all the cake crumbs you're left with after a week of leveling cakes for stacking, filling, and frosting.

Basically, you take a 9" x 13" cake pan full of crumbs, add about 2 cups of frosting (perhaps less, depending on how moist your initial cake recipe is), squish it all together, and make balls about 1-2 inches in diameter. Freeze them individually on a sheet pan for 20-30 minutes and dip in tempered chocolate or chocolate coating. They're really cute on miniature cupcake liners, all boxed up and ready to go for party favors, hostess gifts--you name it!

Bakerella has made cake pops a worldwide phenomenon through her blog and now soon-to-be published book. These take a lot more effort but are probably worth it in the end. I can imagine the reaction you'd get from your crowd! Check out her site and view her amazing gallery of cake pop artistry. The first time I made them, it was more of a deliberate effort. The client wanted them to start with, so I had to bake a cake from scratch (because that's how I roll), crumble it up, make the frosting (because I just don't do canned frosting of course), and mix it all up for the ball "batter." It seemed like a lot of labor to basically have something mini-cupcake-sized anyway. I didn't quite get what the hubbub was about, but knowing its the best way to make use of "cake droppings" these days helps you feel more sustainable in today's waste-conscious society. You can even freeze your cake crumbs for up to 3 months and use them as needed.

I recently made a bunch of cake balls and debuted them at my book club. For years, these wonderful folks have been my test kitchen, and I have soooooo appreciated them for that. Everyone loved them and thought they were one of the best desserts I've brought to a meeting. One longtime clubber actually came up with the name I'll be using to add them to my menu: Bomb-bons! Very sassy and the perfect thing to call something that packs that much of a sugar punch!

So if you're interested in Bomb-bons a la Pomegranate Sweets & Savories, give me a call or visit my site to order some. I'll be posting the available flavors each week. This week, I'm featuring Grandma's Chocolate, Carrot, and Vanilla Buttermilk. And maybe, when Bakerella's book comes out, it might inspire me to work on a pomegranate-shaped one I can call my signature Bomb-bon!

July 19, 2010

Cool Tools: Butter for Brains

I have discovered the whimsical world of Worldwide Fred. Talk about pan addiction! I recently purchased a few pans that have me so excited about what I can do with them, I can't stop thinking about them...

For example, the Brain Freeze set at left, first and foremost for ice, can also double for Jell-O jigglers, panna cotta, and butter! Imagine that served up with your daily bread! I'm even going to try them with melt-and-pour soap base this week and see how those turn out. I could call them Smart Soap...

I also recently purchased the Worldwide Fred Cakewich pan. I haven't made anything yet, but the possibilities are endless, even on the savory side. It comes with a recipe for a vanilla pound cake, peanut butter frosting, and berry compote. But I'm thinking you could even do your favorite white bread recipe with just about any kind of fixings and serve up a big sandwich for the cutting!

All jokes aside though, it's good to always investigate all the possibilities of your novelty pans. I have a fetish for them, so goodness knows I don't always follow this rule of thumb. But I do have a dozen-cavity miniature egg pan from Williams-Sonoma from years ago that not only makes good eggs (no pun intended), but bumblebees, ladybugs, and hedgehogs too. (Wilton makes one too, with only eight cavities though.) The Nordicware baby Bundt pan can make pumpkins, apples, and all sorts of round seasonal shapes (see right). Heck, Bundt pans in general do a lot of things besides your average Bundts. Try this caterpillar cake design some time!

July 1, 2010

S'more Than Enough

I think there's an undeniable fascination going on with the graham cracker + marshmallow + chocolate thing. I have seen s'more options for making s'mores-type goodies this summer than ever before. Having been a Girl Scout who enjoyed my fair share of camping trips and campfires, I adore them! What is it about oozy, chocolatey goodness with a rustic whole-grain crunch? And now, s'more than ever, there are so many ways to work this ooey gooey equation into summer desserts. (OK, I'll stop with the s'moring now...)

Here's a little background on these goodies... The term s'more comes from the phrase "some more"--a typical request when the treat became a regular around the campfire. This article details some history on the s'more, indicating that the first real recipe was cited in a Girl Scout handbook in 1927. Marhsmallows were an easy-to-transport item along a hiking trail and warmed up nicely over a campfire. Chocolate bars and graham crackers were also just as portable, and so all these items came together in a sticky sweet treat that became synonymous with the great outdoors.

Lately, more varieties of desserts have oozed onto the scene, using these three elements, only in different ways. This cookie recipe from Martha has me wondering whether a "graham-like" cookie would be more satisfying than a graham cracker. They sure are cute little buggers and would make a great presentation at a winter tween slumber party, when you need to fake a campfire with your good ol' gas oven. (Pretend the pilot light is your open flame.)

Or if you really wanted to go all-out Martha, you could seriously impress your friends by putting together one of these for a weekend getaway: the S'mores To-Go Box! Real homemade marshmallows are included in Martha's version. I must admit, once you've had a homemade one, it's hard to go back to ye ol' store-bought Kraft marshmallows. There is some sort of melt-in-your-mouth madness going on with homemade versions that beckon you to their side. You've got to try it at least once before you knock it. It's not a time-consuming task, but without the preservatives that store-bought ones harbor, just remember that homemade doesn't last as long. The major plus though is that you can flavor them any way you like. I put strawberry Nestle Nesquik or cocoa powder in mine and sometimes mix them up for holiday gift-giving in a sort of Neapolitan pack.

But so far, my favorite rendition of this classic treat has been the s'mores brownie with marshmallow ice cream concoction I put together a few weeks ago for an impromptu dinner party with friends. It starts with this brownie recipe from the Food Network, topped with chocolate buttercream, and accompanied by a scoop of marshmallow ice cream. I eliminated the marshmallow topping in the brownie recipe and served a chocolate-frosted brownie with a scoop of marshmallow ice cream on the side. Of course this one can't be passed around a campfire on a camping trip, but it sure can make a rather metropolitan spread feel like a campsite. Just play your nature sounds alarm clock in the background while you plate it up!

August 10 in National S'mores Day, so you have some time to experiment on which of the above you'll treat yourself to that day. That's s'more than enough time!

June 17, 2010

Sweets & Snacks Expo 2010

For the first time in my life, I'm involved in a line of work that has conventions! I loved going to them with my dad as a kid.  He was a surgeon, and so I'd end up wandering around these medical convention expos with him, grabbing free socks and backpacks, emblazoned with some medical research or drug company's name. We always had a bevy of pharmaceutical company pens and Post-It notes in our house, along with our fair share of t-shirts bearing fungal cell structures and other medical oddities you wouldn't even be caught mowing the lawn in!

But now I'm in a field where I get to attend things like the Sweets & Snacks Expo, which was held at McCormick Place in Chicago on May 24-27. This is the candy and snacks industry's chance to justify the purpose of high fructose corn syrup, monosodium glutamate, and maltodextrose in your diet. I think I acquired diabetes by just walking in the door! Nonetheless, I had a great time and learned a lot about the snack industry, like how Frito-Lay is becoming one of the greenest snack producers in the world, with compostable packaging and by using recycled water and solar power in its plants. Or that there will now be a line of Fancy Nancy Sweethearts candy and that Pringles has gone multi-grain.

We are not big snackers in our house and tend toward simple tortilla chips and a good homemade salsa or a bowl of cereal to tie us over between meals, but it was fun to see all these vendors in one place and to bring home everything from chocolate-covered Peeps to chewy Lemonheads. As a cupcake baker always looking for the right topper, it was heaven on Earth! I also experienced yet another celebrity sighting, at least in the cupcake-baking world. Authors Karen Tack and Alan Richardson, of Hello Cupcake! fame, were in full cupcake-demo swing, showing conference goers how to make cupcake toppers out of anything from Kraft caramels to Nutter Butters. They are just as jovial in person as they come across in their books, and like the big cookbook nerd that I am, I returned the next day with both my Hello Cupcake books for them to sign. I also saw the mayor, who I've heard is not even really an eater, much less a snacker, but that was good PR for the city for him to show up, even if he doesn't so much as pop a Hershey Kiss in his mouth. More people attended this year's show than any other Sweet & Snacks Expo in history and there are more candies, sweets, and snacks being produced worldwide now than ever before. (So much for healthy eating!) In fact, at one time, Chicago was the biggest candy producer in the world; now it's Denmark. Not sure how that transition happened--maybe Denmark wanted to be known for more than just a breakfast pastry.

Take a look at my photos on the Spoonfoolery Photostream. You'll see some general high-fructose insanity, like the Native American headdress made entirely out of candy and a Mona Lisa mosaic constructed with Jelly Bellys. And then maybe you'll want to go eat a big salad because your blood sugar will have spiked just looking at this stuff!

June 10, 2010

Oh, the Places You'll Go!

Last week, I finished my first full term as a baking and pastry arts instructor. It was a dream job with a textbook start and a photo finish. I couldn’t have asked for a better experience post-corporate America. A year ago, I finally walked away from the cement wall I’d banged my head against for 15 years and plunged head-first into a career as a baker and pastry chef. On June 2, as I met all the parents at the pizza banquet my students had slaved all afternoon to make (totally and completely from scratch, including doughs and sauces!), I was never more thankful for my one-year-old decision.

Teaching is so satisfying. I loved watching their minds swell with baking knowledge over the weeks of our program. To see them, just 3 months ago, unable to wrap their brains around the concepts of yeast and how it activates bread life, to happily kneading pounds and pounds of pizza dough and knowing how to handle a rolling pin—well, it just warms the cockles of my heart! We began in March with the simplicities of blueberry muffins and cornbread. Along the way, they learned how to make cinnamon rolls, frost cupcakes, and bake brownies. They hand-rolled chocolate truffles and assembled caramel pecan turtles. They went from England (scones) to Italy (pizza dough), and on our last day, they planned and executed a banquet welcoming their parents to our kitchen. My pastry queens!

And the pizza banquet was a HUGE hit! We made classic pizza dough with a homemade pizza sauce and plenty of fun toppings, along with a salad trimmed right from the youth center’s rooftop garden. We finished everything off with a dessert pizza, assembled with a cookie dough crust, a vanilla yogurt and cream cheese “sauce,” and lots of fresh fruit, with chocolate sauce drizzled over the top. Parents were satisfied, and the kids were quite proud of their work. Considering so much was made from scratch, it would be hard to share all the complete recipes here, so I will meet you halfway and give you my infamous dessert pizza recipe. I've been making it for years--a great dessert staple, with backyard barbeques, and the celebration of youth and the whole learning process upon us this graduation season.

Dessert Pizza

Cookie Dough Crust

3 cups all-purpose flour
1 teaspoon baking powder
1/2 teaspoon salt 
2 sticks butter, unsalted, softened (8 oz)
1 cup granulated sugar
1 large egg
1teaspoon vanilla extract
dash of almond extract

Sift together the flour, baking powder, and salt. In a mixing bowl, beat the butter and sugar until light and fluffy. Stir in the egg and both extracts.

Slowly add flour mixture (1 cup at a time) and stir until incorporated. Form the dough into a disc and wrap in plastic wrap. Refrigerate for at least 1 hour.

Preheat oven to 375 degrees F. Press the dough out onto a parchment-lined 12-inch pizza pan. Bake the cookies for approximately 12-14 minutes or until the edges begin to turn golden brown in color. Remove from oven and allow to cool completely.

Yogurt-Cream Cheese Sauce

2 8-oz packages light cream cheese, room temperature
1 1/2 cups lowfat vanilla yogurt
Powdered sugar to taste

Blend cream cheese and yogurt in the bowl of an electric mixer until smooth. Add sugar by tablespoonfuls until desired sweetness. Chill 30 minutes before spreading.


Hot Fudge Sauce

3/4 cup semisweet chocolate chips
3 tablespoons unsalted butter
1/3 cup heavy cream
2 tablespoons sugar
1/3 cup light corn syrup
1 teaspoon vanilla extract

In a microwave-safe container, heat the chocolate and butter in the microwave on half power in 30 second intervals until melted. Set aside to cool.

Heat cream in medium saucepan over low heat. Add sugar and corn syrup and stir until sugar dissolves completely. Add cream mixture to melted chocolate and return to pot. Continue to heat mixture over low heat, stirring constantly. Add the vanilla and pour into a small pitcher.

To assemble pizza, spread yogurt-cream cheese sauce over cookie crust. Sprinkle with assorted fruit (pineapple chunks, strawberry and banana slices slices, blueberries, mandarin oranges). Drizzle with chocolate sauce. Slice into squares and serve!

May 13, 2010

Book & Restaurant Reviews: Bobby Flay's Burgers, Fries, & Shakes and State & Lake

It's a two-fer today... Call me a bad Hindu, but I love a good burger every now and then. I personally can't tell a flank steak from a strip steak, so I leave the real meat prep up to the professionals and hardly ever make them at home. However, I am a HUGE fan of Bobby Flay, and so when I stumbled across his newest, Burgers, Fries, and Shakes, at the library, I immediately brought it home and proceeded to salivate.

I dream of throwing down with him one day on his famous TV show, be it cupcakes, cookies, or even my chilis and soups, which many of you have told me are your favorites here at Spoonfoolery. But at least this cookbook has given me some confidence for summer grilling season. His basic burger recipe is the same throughout, but he spins each possibility for between your buns as anything but ordinary. From giant basil leaves in place of lettuce for his Trattoria Burger to a burger variation on the Cubano, today's "It" sandwich, Flay travels the globe in good flavor. Burgers such as the California (avocado, tomato, and watercress--what else were you expecting?), the Carolina (BBQ sauce and slaw), the Cheyenne (shoestring onion rings, bacon, and a to-die-for black-gold of a homemade BBQ sauce recipe that he gives you as well) represent this great nation of beef too. And the fries-and-onion-rings tutorial midway through the book is great for the frying illiterate, such as yours truly. I couldn't even deep fry the Indian stuff until very recently, so it's good to know some foolproof ways to handle a burger's best buddies.

The shakes portion of this cookbook simply made my day! Somehow, Flay makes it seem A-OK to prepare a 1,500-calorie meal at home, even with topping it off with one of these sweet-and-creamy indulgences. I see a Blackberry Cheesecake Milkshake or a Toasted Marshmallow Milkshake in my very near future. I am also realizing how my plan to borrow cookbooks from the library is slowly backfiring, as this is officially the third book I've borrowed lately and then purchased promptly afterward!

Perhaps what made a burger cookbook catch my eye in the first place was thoroughly enjoying one at State & Lake, inside the Wit Hotel in downtown Chicago. This is the quintessential gastropub, with a mighty fine beer list (16 on tap!) and even a reasonably priced wine list (for downtown Chicago). It's standard pub fare taken up a notch, with such recent fancy-pants items on the bar scene as salted cod brandade, savory beignets, and braised short ribs. The mac-n-cheese, which my husband sort of ate (but not really, since stout on draft generally replaces a meal for him in such places!) sports a little truffle oil but unfortunately was not cooked al dente, so I grew bored with it fast. However, my burger was nicely done (for some reason medium well seems to be a hard thing for a lot of places to accomplish these days), and the fries would probably meet Bobby Flay's standard--crispy on the outside, long and skinny enough to cook through well on the inside, with a minimal toss in salt and parsley flecks. Yum! I tend to do only half a burger in the restaurant and take the rest home for lunch the next day, and I must say, it heated up nicely and was just as enjoyable a day later. Now, if only they could master mac-n-cheese, and it'd get my total seal of gastropub approval, but then, I guess there's always Bobby Flay's Four Cheese Burger in the book to make up for that!

All this said about burgers, fries, shakes, and mac-n-cheese mistakes, I'd like to take this moment to introduce our latest addition to the Spoonfoolery editorial staff, Burger King. Burger King is a true connoisseur and hopes to take you all over Chicago (and perhaps this great nation) in search of the more perfect union of meat, bread, toppings, and fries. Look for his restaurant reviews and random research on America's favorite sandwich soon!

May 9, 2010

Chocolate Chip Cookies Three Ways

I've been on a quest for the perfect chocolate chip cookie recipe. A few weeks ago, I had the middle schoolers I teach at a local youth center make the Nielsen-Massey chocolate cookie recipe I've been meaning to try for years. Recommended to me by a dear fellow baker friend of mine, I knew we could do no wrong with this one. They couldn't have come out more perfect, really. They were slightly crispy around the edges and evenly puffed from the middle out, so they were nice and chewy on the inside with some crunch to the edges. In fact, I think they looked quite like anything you'd buy in a box, but then tasted so much better. However, when I got home and tried the same recipe, they came out overly spread-out with hardly any heft to them at all. Like a bunch of flying saucers with chocolate chips in them! Disappointing in my pathetic Frigidaire convection oven (which is really just a mere bunch of gnomes huddled together and blowing from the back--convection my a$$!). In this case, I'd lend the perfection at school to the good ol' trusty Blodgett commercial convection oven. Oh, how I'd love to have one of those aerators in my home! I also think weak home ovens, like the Frigidaire brand in general (the stock developer's appliance from this housing bubble), don't really know what to do with all that butter, and so, well... spread happens.

Next up, I leaned back on my standard staple, Sherry Yard's Quintessential Chocolate Chip Cookies. I got her Desserts by the Yard cookbook about a year ago and switched over from the Tollhouse recipe to this then and have never really gone back. Her recipe requires a little less butter and quite a bit less sugar than the Nielsen-Massey one (you'd have to double Sherry's to come up with equal proportions to the Nielsen-Massey one). Again, a much more flat and crispy return than we got at school, but my husband and I actually liked the flavor of these better. I think we are fans of anything with less sugar, so I do believe this will still remain our staple chocolate chipper. One major difference with Sherry's recipe is that she asks you to give it some fridge-chillin' time--an hour or up to overnight. Interesting, since one doesn't really think of cookies as needing any kind of "glutenization" process. So I speculate she's just going for the chill-before-baking plan of action, which helps most cookies keep their shape. I often do this with my giant decorated cookies, chilling them cut and laid out in their pans for 10-15 minutes before baking. This helps keep them from spreading too much and maintains their sturdiness for handling during the decorating process and for packing and shipping. Next time, with Sherry's, I'm going to go for overnight and see if they hold their shape better.

Last but not least, a recipe on the back of the Gold Medal flour bag caught my eye, and I thought I'd try them tonight--Oatmeal-Chocolate Chip Cookies. I love oat-anything cookies because somehow, they make me feel less like I'm eating a cookie and more like I've got a granola bar in wolf's clothing! At the risk of sounding rather Goldilocks, these were just right! The gnomes in the back of the oven seemed to make them nice, puffy, and even like the ones at school, but then they were also chewy and crispy in all the right places. With the added heft of the oatmeal, they made the perfect ending to a weekend stuck inside working both days. Here's the recipe, with a special secret ingredient. If you like Indian fusion, you'll love this!

Chai Oatmeal-Chocolate Chip Cookies a la Gold Medal Flour

2 cups quick-cooking oats
1 1/2 cups unbleached all-purpose flour
1 teaspoon baking soda
1/4 teaspoon salt
1 teaspoon chai spice blend
1 1/2 cups packed light brown sugar
1 cup butter, room temperature
1 teaspoon vanilla
1 egg
1 cup semisweet chocolate chips
1 cup chopped nuts, optional

Preheat oven to 350 degrees F. In a medium bowl, sift together oats, flour, baking soda, salt, and chai spice. Set aside. In a large bowl, cream butter and brown sugar with an electric mixer until well-blended. Add vanilla and egg and mix well. Add dry ingredients and mix well. Stir in chocolate chips and nuts (I used a mix of butterscotch, white chocolate, semisweet, and M&Ms!).

Drop by rounded tablespoonfuls or with cookie scoop about 2 inches apart onto parchment-lined baking sheet. Bake 9-11 minutes or until golden brown. Cool slightly and remove from cookie sheets to cooling racks. Makes about 3 dozen.

May 3, 2010

Zesty Lemon and Flaky Pastry visit Longman & Eagle, The Whistler

All the cool kids live in Logan Square these days. They're eating at recently opened Longman & Eagle, and they've been drinking at the nearby Whistler for a while. Admittedly, I'm not really cool. I always sat with the nerds when I was in school and would probably still fit in with them today. But Flaky Pastry, who I hereby declare a fellow nerd, and I did our best to fit in as we checked out both venues.

You can't argue with Longman's simple motto, which is emblazoned on its door: Eat Sleep Whiskey. All three count me as one of their biggest fans. Longman handled the latter expertly in Vieux Carre, a cocktail comprised of rye whiskey, vermouth, cognac, and Benedictine—a sort of uber-manhattan. (Whiskey lovers will find an exhaustive list of bourbons and other mainly American whiskeys on the menu.) I didn't find the kitchen as skilled as the bar, however. Yes, the kobe meatballs are little nuggets of deliciousness, served with a bright pesto and creamy polenta. And the arugula, roasted beet, and goat cheese salad was perfectly enjoyable, if a little too skimpy on the cheese. But my main course, veal breast and beef cheek manicotti, left me feeling a little flat. The veal was mostly tender and enjoyable but too fatty in parts. The manicotti, meanwhile, was too chewy. I also thought the pairing of the two didn't make sense, but that's a minor quibble. This isn't Alinea, after all. Flaky Pastry found her hamburger to be unforgivably dry and bland, and didn't even finish half of it. And it seems that veering off the whiskey list and ordering a simple white wine caused some melodrama between the bartender and the varietals. That had to be sparkliest Chardonnay she'd ever had! Some of our fellow patrons swore by the enormous, unwieldy appearing Sloppy Joe, though my thoroughly cool hair stylist (and Longman regular) tells me it shares the same quality as the burger. Caveat emptor!

Following dinner, we headed to The Whistler, a hipster haven that has (justifiably) gotten a lot of press for its creative, classically inspired cocktails. It's rather nondescript, easy-to-pass-right-by exterior decor is really no indication of the good times that can be had inside. Live music each night is a virtual guarantee, and although there's no food service, pizza delivery and takeaway is never frowned upon.

Among the cocktails, my favorite was the Slippery Slope, another manhattan-ish blend, but this time with apricot and lemon, in addition to the usual whiskey and vermouth. I also wouldn't turn down the Welcome Back, with gin, St. Germain, lillet blanc (one of those liquors popping up everywhere these days), and absinthe, which we both enjoyed. Every cocktail is just $8—a more than fair price for the quality and effort. We arrived early, around 8 pm, but by 9, the bar was brimming with neighborhood folks sporting the standard Logan Square uniform: skinny jeans, flannel, shaggy hair, and a PBR in the right hand. (Lest you think I'm exaggerating, the guy sitting at the bar next to me matched that description to a T). But these not-so-cool kids would happily drink at The Whistler again. Maybe you'll find us both relaxing on the back outdoor patio this summer!

April 27, 2010

What Exactly Is Monkey Bread?


Seriously. Who came up with it, why is it called that, and why is it just one of the best comfort foods around??? My middle-schoolers made it in our baking class yesterday afternoon, and that's the first thing they asked me. And I had no idea! So I promised them I'd research it and get back with them at tomorrow's class. (Also, Zesty Lemon is still working on his restaurant review, and I thought this post would entertain you in the interim.)

This account at The Food Timeline provides the most detail I've ever read on the subject. The recipe itself derives from typical sweet roll yeast breads of yesteryear, and monkey bread (a.k.a. bubble bread or pull-apart bread) can be traced back to pioneer days, when cowboys on the range preferred one-pot cooking for just about everything, including their daily bread. Early 20th-century cookbooks described all kinds of "balled rolls," including Parker House rolls and clover-leaf rolls, with its first official mention in the New York Times coming in 1976. Nancy Reagan even began serving it at the White House in the '80s.

However, one thing's for sure--no one really knows why it was ever called monkey bread to begin with. There are several possibilities, including how it resembles "a bunch of monkeys" all jumbled together. Another account says it has to do with all the "monkeying around" you need to do with balls of dough to get this dish together!

All that said, it's a mighty tasty treat, and in these days coming into spring, where the evenings are just cool enough to still warrant some sweet-n-toasty baking, it's the perfect thing. You can get Nancy Reagan's recipe at The Food Timeline link, but try mine sometime and let me know what you think. The kids in class were all over it; so much so, I didn't even get a bubble of bread to myself!

FOR THE BREAD
1/4 cup warm water
pinch of sugar
1 package yeast (2 1/4 teaspoons)

3/4 cup warm milk
2 tablespoons butter, room temperature
1 egg
1/4 cup sugar
1 teaspoon salt
3 1/4 cups all-purpose flour

FOR THE COATING
1 stick butter (8 tablespoons)
1/2 cup chopped nuts (pecans or walnuts work best)
2 teaspoons ground cinnamon
3/4 cup light brown sugar

FOR THE ICING
2 cups powdered sugar
1/4 cup milk

Spray a Bundt pan with cooking spray and set aside. Spray a medium bowl with cooking spray and set aside.

Put the warm water and a pinch of sugar in a small bowl. Sprinkle yeast over top and allow to dissolve and get foamy (about 5 minutes). In the bowl of a stand mixer fitted with the paddle attachment, place milk, butter, egg, sugar, and salt. Combine yeast mixture and mix well on medium for about 1 minute. Change to dough hook and add flour, kneading for about 2 minutes. (To do this by hand, combine yeast mixture with milk, butter, egg, sugar, and salt using a wooden spoon or spatula. Add flour and mix well with hands. Turn dough out onto floured surface and knead by hand for 5 minutes.) Place dough in oiled bowl, wrap with plastic wrap, and set aside. Allow to rest in warm place for 20 minutes.

Make coating: Melt butter in small bowl and set aside. In a separate bowl, combine cinnamon, nuts, and sugar. Sprinkle 2 tablespoons nut mixture into bottom of Bundt pan.

Cut dough into 1/2-inch pieces and roll into balls. Dip balls in butter, then nut mixture, and place in Bundt pan, layering as you go. Wrap pan in plastic and set in warm place to double in size (about 1 hour).

Preheat oven to 350 degrees F. Bake bread for 30-35 minutes. Allow to cool in pan for 15 minutes, then turn bread out onto wire rack. Cool another 20 minutes.

Make icing: In small bowl, stir milk into powdered sugar until there are no lumps. Drizzle over bread and serve!

NOTE: In the interest of time during class, we eliminated the 1-hour rising time in the Bundt pan, and our monkey bread still came out perfectly crispy on the outside and soft, warm, and sweet on the inside!

April 15, 2010

My First Cake Contest

I'm no Cake Boss or Ace of Cakes, but I tried my hand at a cake decorating competition last weekend here in the greater Chicago area. Cake decorating is just one of the many things I do; inherently, I'm more of a baker than an artist. I like texture and substance in food more than presentation and artistry.

But this was fun, and I was glad I participated. I didn't win anything, but I learned a lot. Like how much bigger is better at these sorts of things! I knew from the moment I entered the parking lot and saw all the massive SUVs that I would be outdone by size. My trusty Chouquette, the pint-sized MINI Cooper a.k.a. Pom-mobile "delivery truck" for the business, arrived carting not one but two little entries in its tiny boot, and I went up against Hummers and Suburbans carting massive 6-foot tall towers of detail and decor!

The judges weren't all that constructive (check out the new Flickr Photostream feature at right and see the captions for total cake contest coverage), but as in any competitive sport, it's not whether you win or lose, it's how you play the game. I was proud of my work, enjoyed having the chance to execute some crazy ideas swimming around in my head, and got to hang out with some really supportive friends who made the trip to way-the-hell-out-there Chicagoland to wish me well.

Throughout this blog post, I've included a few of the winners, with my own two posted at the bottom. The top left is Sunday's Best of Show winner; the one at right and directly below was Decorator's and People's Choice. But definitely check out the Photostream to get some close-ups on my own handiwork.


On a final note, I wanted to take this opportunity to introduce a new addition to the Spoonfoolery food blogging staff--my good friend The Zesty Lemon! Now our guest restaurant critic, he is a man about this food town, an experienced restaurant critic, and a very fabulous foodie. He's an expert home chef, regularly knocking anything French or Italian out of the ballpark. Zesty Lemon and I recently experienced a local eatery in my West Side Chicago neighborhood that's been all the rage this spring. Watch for his report on Longman & Eagle in the next post. Welcome Zesty Lemon!

April 5, 2010

Restaurant Review: El Cid

I've lived in Logan Square for four years and had yet to hit either El Cid 1 or El Cid 2, until this long holiday weekend. What a perfect way to spend Easter--with Mexican food! OK, OK, makes no sense really, but we managed to bookend the weekend with pretty days here in Chicago, which bode well for long walks in the 'hood and well, finally trying a restaurant we should have years ago. Neighbors have been singing its praises for years, and they couldn't be more right. It was terrific Mexican fare at a reasonable price with monstrous margaritas, a sunny patio, and a fun lounge for late-night snacking. Our service was a bit slow, thanks to the weather bringing out droves of sun soakers, but the food made up for it. I highly recommend the chicken enchiladas with mole sauce and the fish tacos, which we shared over a late lunch and then proceeded to need no dinner later. The tortilla chips are addictive, and the guacamole light and creamy with just the right kick. I think this will be a summer favorite on our list!

April 3, 2010

Cooking School: Shortening vs. Butter

I am a sucker for the check-out aisle baking magazines. My favorites are the Better Homes & Gardens Special Interest Publications, like Ultimate Desserts (on sale starting last month). But upon purchasing and studying this "bookazine," it left me wondering why so many cookie recipes in it called for shortening. As a cake decorator, I am stumped by the fact that so many of my brethren choose to make "Criscocream" frosting instead of real buttercream. Cheaper, I'm sure, but way too synthetic for my book. I do like going halfsies in pie crust. (See my post Pie Crust Primer for the perfect pastry crust.) But my affinity for using vegetable shortening in cooking and baking pretty much stops there. I'm all butter, all the way after that.

So I decided to do some research into why the BH&G kitchens use shortening sometimes instead of butter in baking, especially with cookies. Camilla at Enlightened Cooking investigated the dilemma in depth in this post. Butter naturally contains water and shortening doesn't, so shortening yields a higher, lighter texture and butter generates a flatter, crispier little number. But if it's flavor you're really going for, stick with butter. You'll notice the difference. She also conducted a comparison test using her double chocolate cookie recipe, which proved that although the shortening version had a lighter, puffier texture, the butter version was tastier and more flavorful. I guess it's really just what you go for in the end (or perhaps what's stocked in your fridge or pantry!).

My recommendation would be, as she suggests in her post, to make note of how much a role the butter plays in your recipe and go from there. If it's a central role (1 stick or more), you may want to go with butter. That much butter in a recipe means to be part of the flavor profile as much as the structure. Also, there's nothing wrong with going halfsies on buttercream too, if you're needing to save a buck or you notice your audience actually prefers Criscocream. That's what the grocery stores use, and sadly, what some people are used to these days. Real buttercream might throw your group for a loop, believe it or not!

March 29, 2010

A Birthday Meal Down South

Just back from a road trip to see friends and family down south. While there, I had a hunkering for a truly southern meal, and my good friends R & H in my hometown appeased me. With a birthday in our midst, we celebrated in style with a lightened-up version of a country favorite, Country-Fried Steak with Mushroom Gravy and of course, classic yellow cupcakes with chocolate buttercream. Good times were had by all, and we sauntered to bed that evening comfortably stuffed!

This is a keeper recipe I've had around since earlier days of subscribing to Cooking Light. I've done nothing to it except to try and make it at least once a year in order to stay in touch with my southern roots! You can use just about any type of mushroom for this, but the button mushrooms you see here make the best presentation. We served this with green beans sauteed in toasted almonds and olive oil with some cracked pepper and salt. Instead of mashed potatoes, I roasted baby red potatoes in rosemary, sage, oregano, garlic powder, and more olive oil, salt, and pepper.

As for the cupcakes, I polled before I arrived and knew to bring a recipe for classic yellow cupcakes with chocolate buttercream frosting. This is a variation from Cupcake Bakeshop by Chockylit, one of my all-time favorite cupcake blogs.

Classic Yellow Cupcakes with Chocolate Buttercream

1 1/3 cups all-purpose flour
1 tsp baking powder
1/4 tsp salt
8 tbsp (1 stick) butter, room temperature
1 cup sugar
2 eggs, room temperature
1/2 cup milk, room temperature
1 tsp vanilla extract or vanilla bean paste

Preheat oven to 350 degrees. In a separate bowl, sift first three ingredients together and set aside. In another bowl, cream butter and sugar together with an electric mixer until light and fluffy, about 3 minutes. Add eggs, one at a time, and mix well each time. Add dry ingredients alternately with milk in four additions (flour, milk, flour, milk) and mix until virtually no lumps (about 3-5 minutes). Add vanilla and stir to combine. Divide evenly in lined cupcake pan (1/2 to 2/3 full) and bake 16-18 minutes until golden or toothpick comes clean. Cool completely before frosting.

March 21, 2010

Cooking School: What's the Deal with the Easy-Bake Oven?

I have always been intrigued by this machine. I wanted one so badly growing up, but my mother was a purist and believed in the big bad oven and teaching us how to use it. She did borrow one from a friend's kid for a summer to appease my interest. I remember being so anal as to actually slice the cakes into perfect portions to give to my family. Yes, there is something so fascinating to young bakers about cooking food with a 100-watt light bulb.

Since spending time with my nieces this weekend, who just got one for Christmas, I've started wondering about it all over again. I simply need to understand how this stuff works with the simple heat of a light bulb! After much Googling, I learned that no one really can say how it works, except that it does. NPR went so far as to conduct a gourmet cooking face-off with two industry notables, Caprial Pence of PBS cooking show fame, and Oprah's chef, Art Smith. Wikipedia and About.com both chronicle the efforts of the toy companies who've owned the Easy-Bake patent over the years. None of these resources really explain how a 100-watt light bulb can bake a wild mushroom flan. But it does! I would need to consult an engineer, but my best guess would be the ratio of heat to space. If you stick a light/heat source of that magnitude into a less-than-a-cubic-foot space, it'll probably cook anything!

I'm glad the Easy-Bake Oven is still around and entertaining kids across America. Hopefully, now that gourmet chefs' recipes can be executed in them, it will encourage wee ones everywhere down the path of culinary success. I hope to have that influence myself here in the coming weeks, as I've just accepted an opportunity to teach baking and pastry arts at a local youth center for the spring term of its after-school program. I won't be Easy-Baking, that's for sure, since the goal is to teach these kids really cooking and baking with a convection oven and electric stand mixer. But I'm very grateful for the opportunity to be a part of their learning process. I am truly enjoying my change in career, and I'm looking forward to helping Chicago youth choose this avenue right out of the gate!

March 14, 2010

Lamb Vindaloo--Woo Hoo!

Even though I grew up eating it at nearly every meal, I have only recently clued in to the fact that there is actually no such thing as a curry, according to The Food of India, an amazing text and cookbook that every Indian food connoisseur should have. The term comes from the Tamil word kari, meaning black pepper. Dishes are named for the amalgamation of spices used to make them (rogan josh, vindaloo), the cooking method (korma--in cream, or biryani--with rice), or for their main ingredients (saag--spinach, aloo gobi--cauliflower). Curry powder doesn't really exist in India either, with the closest thing being masala (a spice mix). There are hundreds of masala combinations, such as garam and Madras.

I grew up eating traditionally South Indian food, which is not the standard fare served in Indian restaurants. Its mostly vegetarian and includes things like dosa (rice flour crepe filled with a curried potato mixture) and idli (steamed rice cake served with a coconut or cilantro chutney). However, I have come to embrace North Indian selections such as vindaloo because of its combination of all my favorite Indian spices and its serious kick! You can make this spice mixture en masse and keep it around as a rub for just about anything (burgers, roasted chicken--you name it). But it is definitely worth slow cooking a lamb shank in some time. This was almost so good, we didn't want to eat it, for fear we'd be finished with it all too soon! Most of the ingredients can be found at your grocery store or Whole Foods, but if you live in the vicinity of a good Middle Eastern or Indian grocer, stock up on some of the exotics like cardamom pods and bay leaves. They're much cheaper for bigger quantities there.

Lamb Vindaloo

2 T coriander seed
1 T cumin seed
1/4 tsp black peppercorns
3-4 green cardamom pods
3-4 whole cloves
2 tsp black mustard seeds
1 tsp cinnamon
1/2 tsp cayenne
1 T turmeric
2 tsp salt
6 cloves garlic, peeled and minced
2 inches fresh ginger, peeled and minced
2 lbs lamb shanks, fat mostly trimmed
1 cup red wine
1 medium tomato, diced (or two roma/plum tomatoes)
1 medium Vidalia onion or other sweet onion, finely chopped
6 bay leaves
Fresh cilantro leaves

Lightly dry roast (no oil) coriander through mustard seeds over medium-high heat until fragrant (about 3 minutes). Grind these in a spice grinder or clean coffee grinder until fine. Mix with cinnamon, cayenne, turmeric, and salt. Add garlic and ginger and make a paste. Rub over lamb shanks to coat. In a large Ziploc bag or Tupperware, combine red wine, tomato, onion, and bay leaves. Place lamb in bag or Tupperware, seal, and shake to coat evenly. Marinate overnight in refrigerator.

Preheat oven to 275 degrees F. Empty contents of bag or box into oven-proof pot with lid. Cover and roast lamb shanks with curry mixture for 2-3 hours. (You can check at 2 hours and see if it's fall-off-the-bone tender; if not, leave it in for another 30 minutes to an hour). Serve over rice and garnish with fresh cilantro leaves. Serves 4.

March 4, 2010

Cooking School: Feeding a Crowd

Many apologies for the delinquency in posting anything new. I am working on a few ideas, but it's been a bit nutty sitting down to write these days. One of the things I often hear about from people is how difficult it is to plan multiple components to a meal and pull it all off at the same time. I must admit, I struggled with my efficiency in the kitchen until I went to culinary school, which in itself is an education on constant multitasking.

I recently took a cooking class at Chicago's Chopping Block, and the chef was so organized, he scared me. But in a good way! One of the things he pointed out is how in our minds, we think dessert should be done last. Well, that's the way we eat it, but when prepping for a party, you should actually do it first. It is typically one of those things that requires resting or rising a batter or dough, chilling something or the other, baking time, and cooling time. Probably the most time-consuming portion of the meal! So do it first and utilize the resting, baking, cooling, and all-around sitting-around-and-waiting-for-the-next-step slots in your schedule for other things.

Before you shove off, take a look at all your recipes and look for line items such as these, and when something is sitting around and doing nothing, do something else. If you need to bring things to room temp before working with them, then chop vegetables, shred cheese, or simmer or saute something in the interim. If something's gotta chill, then put something else in the oven during that time.

And it's OK to "cheat" with some prepared foods. Get the sliced mushrooms, canned diced tomatoes (no-salt-added versions are the best), shredded carrots or cheese, peeled and deveined shrimp--you name it. The possibilities are endless these days at the grocery store, as more and more food manufacturers are realizing you want to eat healthier and are less likely to buy preservative- and salt-heavy boxed meals but are more willing to buy prepped fresh food.

I recently put all the items in this picture together in 5-1/2 hours--enough to feed a party for 30. And I did this by simply starting dessert first and utilizing the downtimes for up times. You too can be this organized in the kitchen, and you will be ready for those guests, cocktail in hand, apron on the hook, and delicious food just waiting to be consumed!